

Wednesday, April 24, 2013

Tuesday, April 23, 2013

Thursday, April 11, 2013

Wednesday, April 03, 2013
Safety railings for the bridge
Tonight I worked on the bridge just north of Emsingen.
 |
| Installing railings at the workbench. |
 |
| Bridge installed. |
 |
| Looking north towards Hausach. |
Sunday, March 31, 2013
Things are moving ...
... on freshly ballasted track, over bridges, on roads.
 |
| This is the section of road that started the recent explosion of scenery activity. The base material is 1600 grit wet sanding paper glued to a cardboard base followed by lots of swearing, and finally an application of Bragdon power paints. The biggest problem I had with this was that the sanding paper didn't want to stay glued to the substructure. Note to self: white glue = bad idea. Tightbond II wood glue = good idea. I will try another technique for building roadways the next time. Probably styrene. |
 |
| The bridge just north of Emsingen is coming together now as well. There still many details missing, especially in terms of vegetation and routing a small waterfall to the gully that crosses under track to the right just outside this picture. |
 |
| The yard in Emsingen got ballasted, and I de-maerklinized the bumpers at the end of the tracks. Compare the look to an earlier post. |
Wednesday, February 27, 2013

Tuesday, February 19, 2013
More from the Welzbridge
Part of the challenge here is to dress up the existing roadbed in a way that gives the illusion that the track is located on a bridge, not solidly anchored in ... errrmm ... "rock".
Here's what the front of the bridge looks like now. The arcs are in, and the foundations are fit into the scenery. Later I will sculpt some rock work on the right of the bridge as well as fill the gap between the bridge and the tunnel portal.
Notice the jagged sub-roadbed behind the bridge facade. I already cleaned it up a bit in order to fit the wall and the arcs.

Here's an experiment of how this bridge illusion could work out. The veneer strips already frame the track and can be built up further with some scale strips from wood or styrene to complete the bridge deck. Once this is painted, ballasted, and topped with bridge railings, I think the effect should be quite nice.

Monday, February 18, 2013
A little bit of progress
Now that the glue for the bridge is completely dry, I moved on to install the Faller arch-stone strips like I did elsewhere on the layout. Since the plastic is quite springy the strips won't stay in place unless I force them until the glue has dried. Push-pins are very useful for this...

I also built up the scenery support base around the south portal of Tiersteintunnel. It's the usual web of cardboard strips covered with wide masking tape covered in cheap latex paint. While at it, I painted the bright white spackle paste around the Durchlass for the Welzbach. I'm still toying with the idea of connecting the two portals, so that it is possible to look "up-creek" through the tunnel ...

Friday, February 15, 2013
So easy
As promised, here's what the RDC is meant for. ... Automated passenger service! Connect some some Unitrack to the Timsaver, and we can go places. However, I can't really do this myself while working, that's what computers are for.
I connected the NCE interface to USB on my workstation and the cab bus. Set the preferences in JMRI. Pull up a JMRI throttle, and ... it just works. All while David is trying out the Timesaver and switching cars. That's how plug-and-play should be. Up and running in less than 5 minutes. Awesome.
Next up was meddling with the stock BackAndForthTimed.py script a little bit, and voila ... there's the RDC making it's rounds under computer control.
Due to mechanical variations, using the timing approach is not working particularly well. E.g. there's a light uphill climb onto the Timesaver module, and it appears the RDC has a preferred direction, so the endpoints for each trip shift a little bit. Eventually it reaches the end of track on one side of the trip.
However, using timing works accurately enough to be feasible with one detected section on the Timesaver. Until then, here's the RDC making an automated roundtrip across my desk.
I connected the NCE interface to USB on my workstation and the cab bus. Set the preferences in JMRI. Pull up a JMRI throttle, and ... it just works. All while David is trying out the Timesaver and switching cars. That's how plug-and-play should be. Up and running in less than 5 minutes. Awesome.
Next up was meddling with the stock BackAndForthTimed.py script a little bit, and voila ... there's the RDC making it's rounds under computer control.
Due to mechanical variations, using the timing approach is not working particularly well. E.g. there's a light uphill climb onto the Timesaver module, and it appears the RDC has a preferred direction, so the endpoints for each trip shift a little bit. Eventually it reaches the end of track on one side of the trip.
However, using timing works accurately enough to be feasible with one detected section on the Timesaver. Until then, here's the RDC making an automated roundtrip across my desk.
Tierstein South Portal
More making in the garage. Remember those cardboard cut-outs I mentioned before? Work is starting on the replacement.

I'm mounting the Heki wall section on a piece of hardboard to make it more rigid. I won't cut the roadbed for this "bridge". Instead I'll build the it around the exist track. This leads to a somewhat heavier appearance at the top of the arcs, but I prefer living with that rather than fiddling with the track above.

Test-fitting the wall piece. Yep, that's going to work.
Finally, I'm re-using an old Kibri tunnel portal from my Dad's layout for the south-portal of Tiersteintunnel. The black paper is mounted only on one side to allow for access from underneath. I made a bracket from hardboard so that the "tunnel walls" hold their shape.
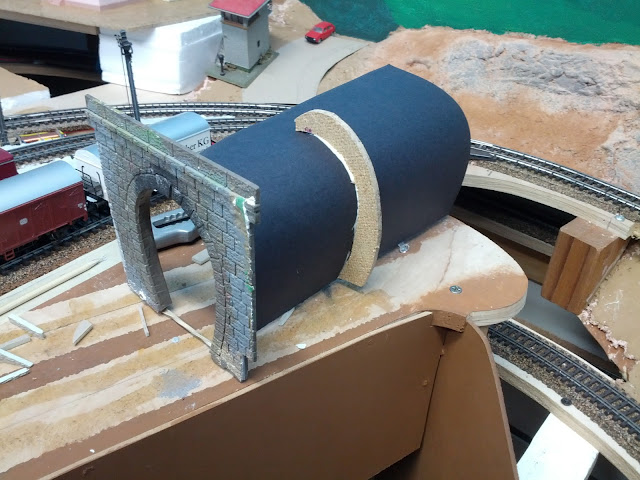
Next up is figuring out how to blend together the tunnel portal and surrounding scenery.

I'm mounting the Heki wall section on a piece of hardboard to make it more rigid. I won't cut the roadbed for this "bridge". Instead I'll build the it around the exist track. This leads to a somewhat heavier appearance at the top of the arcs, but I prefer living with that rather than fiddling with the track above.

Test-fitting the wall piece. Yep, that's going to work.
Finally, I'm re-using an old Kibri tunnel portal from my Dad's layout for the south-portal of Tiersteintunnel. The black paper is mounted only on one side to allow for access from underneath. I made a bracket from hardboard so that the "tunnel walls" hold their shape.

Next up is figuring out how to blend together the tunnel portal and surrounding scenery.
Thursday, February 14, 2013

Sunday, February 10, 2013
When one thing leads to another ...
I just wanted to install the asphalt for the road to the street tunnel in Talheim...
Well, I gotta do the side of the road, too, otherwise this is going to be weird.
If I'm doing the side, might as well fix up that corner at the tunnel mouth.
If I'm fixing up the tunnel mouth, I really should paint the embankment.
If the embankment has wet color, might as well put a base layer of flock down.
If I put flock on one side of the road, might as well put it on the other side, too.
The other side should be a small meadow, since the Emsingen operator will destroy anything delicate there sooner or later anyways. Static grass would be nice.
If I work on the area below the Steinle rockwall, I should really install that drainage culvert. Ooooh, working with spackle paste is nice!
If I install the culvert portal on one side, I should install the other side, too.
Hey, that static grass looks great. Need some on the other side of the tracks below the rock wall, too.
That rock wall is so awfully gray, I wonder if I could put some scenery glue on the ledges and plant weeds.
Oh yeah, that's good. Scenery glue is a a bit too runny for just the ledges, though... That's ok, let's do the other half of the rock wall, too.
I really should install the tunnel portal below Emsingen, as well as the bridge by the waterfall. Oh, and the top of Steinle should finally get grass, too. The rock wall needs more weeds and small bushes. It should be more overgrown.
Treeees. ... I need to make trees ...
...
Ooops, it's late. I should really stop now.
...
Yes, I'm now in full blown scenery mode, and most of the progress is not even visible in the photo.

Now that I completed a major electrical piece of the layout, the plan is to attack the area between Talheim station, Steinlehof, and the card board cut outs in the back over the coming weeks.
Well, I gotta do the side of the road, too, otherwise this is going to be weird.
If I'm doing the side, might as well fix up that corner at the tunnel mouth.
If I'm fixing up the tunnel mouth, I really should paint the embankment.
If the embankment has wet color, might as well put a base layer of flock down.
If I put flock on one side of the road, might as well put it on the other side, too.
The other side should be a small meadow, since the Emsingen operator will destroy anything delicate there sooner or later anyways. Static grass would be nice.
If I work on the area below the Steinle rockwall, I should really install that drainage culvert. Ooooh, working with spackle paste is nice!
If I install the culvert portal on one side, I should install the other side, too.
Hey, that static grass looks great. Need some on the other side of the tracks below the rock wall, too.
That rock wall is so awfully gray, I wonder if I could put some scenery glue on the ledges and plant weeds.
Oh yeah, that's good. Scenery glue is a a bit too runny for just the ledges, though... That's ok, let's do the other half of the rock wall, too.
I really should install the tunnel portal below Emsingen, as well as the bridge by the waterfall. Oh, and the top of Steinle should finally get grass, too. The rock wall needs more weeds and small bushes. It should be more overgrown.
Treeees. ... I need to make trees ...
...
Ooops, it's late. I should really stop now.
...
Yes, I'm now in full blown scenery mode, and most of the progress is not even visible in the photo.

Now that I completed a major electrical piece of the layout, the plan is to attack the area between Talheim station, Steinlehof, and the card board cut outs in the back over the coming weeks.
Saturday, February 09, 2013
Block detection and automatic protection of trains
JMRI comes with a sophisticated signal system, including fully customizable logic. However, most of my panel work started before signal masts were available in JMRI. The simplified ABS (Automatic Block Signaling) used in JMRI also bugged me, since it left signals showing green if the following block is empty, while prototype practice in Germany is to default to Red (Hp0), and set the signal to green only in advance of an approaching train. I also wanted to combine setting routes and signals in my panels. Hence, I created my own signal logic using JMRI logix.
Today I finished block detection for the layout, which opens up resetting signals to Hp0 as a train passes through. I integrated this into my logics by simply adding another rule that triggers on the block detector at an interlocking, and invalidate all routes leading into this interlocking, which as a side-effect sets the signals guarding this interlocking to Hp0. As it turns out this was quite easy to integrate.
The video demonstrates how it all works.
We're following a Schienenbus from Prechtal (staging) to Emsingen, and Talheim, and off to Freiburg (staging). I tried to capture how the physical control panels are used, and especially how signals reset as the train passes through.
I'm using a Viessmann 5217 decoder for the area around Talheim, connected to the Intellibox via the S88 bus. On the upper level around Emsingen I use an Uhlenbrock 63350 decoder that communicates via LocoNet. Both units work well and detect both trains and cars reliably. In order to get a stable read it's important to enable the debounce settings in JMRI. I'm using a short enable and a long disable (200ms / 3000ms) in order to quickly detect when a train enters a block, but keep the block occupied for some time to facilitate JMRI's train tracking logic.
The LocoNet bus voltage used by the Intellibox is a bit unusual, so it's important to use only LocoNet devices with the Intellibox that are explicitly rated to be compatible.
Today I finished block detection for the layout, which opens up resetting signals to Hp0 as a train passes through. I integrated this into my logics by simply adding another rule that triggers on the block detector at an interlocking, and invalidate all routes leading into this interlocking, which as a side-effect sets the signals guarding this interlocking to Hp0. As it turns out this was quite easy to integrate.
The video demonstrates how it all works.
We're following a Schienenbus from Prechtal (staging) to Emsingen, and Talheim, and off to Freiburg (staging). I tried to capture how the physical control panels are used, and especially how signals reset as the train passes through.
I'm using a Viessmann 5217 decoder for the area around Talheim, connected to the Intellibox via the S88 bus. On the upper level around Emsingen I use an Uhlenbrock 63350 decoder that communicates via LocoNet. Both units work well and detect both trains and cars reliably. In order to get a stable read it's important to enable the debounce settings in JMRI. I'm using a short enable and a long disable (200ms / 3000ms) in order to quickly detect when a train enters a block, but keep the block occupied for some time to facilitate JMRI's train tracking logic.
The LocoNet bus voltage used by the Intellibox is a bit unusual, so it's important to use only LocoNet devices with the Intellibox that are explicitly rated to be compatible.
Saturday, February 02, 2013
Seventh Operations session on the Welztalbahn
Stefan and family came to visit today and we retired to the garage to run trains. Stefan managed Emsingen, while I took care of Talheim and ran trains into Emsingen station to get in his way.
This worked out to become a pretty good introduction to switching with car cards and waybills. Overall we ran a light schedule with 8 trains total, and plenty of switching moves in Emsingen and Talheim stations.
I really need to get LED feedback installed in both Emsingen and Talheim panels. That should help substantially with determining turnout positions as well as whether routes control signals, too.
I need to think harder about how to introduce new operators to the layout without overwhelming them with too many details.
Next up is connecting a feedback decoder in Emsingen and doing the same exercise there.
This worked out to become a pretty good introduction to switching with car cards and waybills. Overall we ran a light schedule with 8 trains total, and plenty of switching moves in Emsingen and Talheim stations.
I really need to get LED feedback installed in both Emsingen and Talheim panels. That should help substantially with determining turnout positions as well as whether routes control signals, too.
I need to think harder about how to introduce new operators to the layout without overwhelming them with too many details.
- Due to how the layout is built, it's difficult to map the actual track layout to logical directions. "Where is North, again?" - "As long as you don't turn around it's to the right", is only moderately helpful.
- Maybe a custom design for car cards and way bills including a photo of the car on the pocket. I know what a Gbs-256 or a Gs-39 looks like. My operators don't.
- Need a cheat-sheet for the color-coding on way bills
- Finally, a quick intro to reading European style car numbers, and where to find them on the cars. This tends to throw off people used to American style car numbers, and completely confuses new-comers.
Next up is connecting a feedback decoder in Emsingen and doing the same exercise there.
Friday, February 01, 2013
Kato RDC with Digitrax decoder -- the video
Here's a short demo of my DCC conversion.
Youtube's video editor is very basic, but ideal for putting together a quick video like this.
Also, very appropriately, this train video celebrates more than 600 posts on this blog.
Youtube's video editor is very basic, but ideal for putting together a quick video like this.
Also, very appropriately, this train video celebrates more than 600 posts on this blog.
Digitrax DN143K2 in N Scale Kato RDC (part 2)
Today I cleaned up cabling on the RDC and some more test runs on the office layout.


So, ... what do I do with an RDC on a Timesaver module? This engine is made to go somewhere and come back. Preferably all by itself. That will be the topic of the next installment.

Then it was time for putting the shell back on the chassis. ... without moving the light boards, or breaking any clips, or squeezing cables, or breaking anything else. After several attempts I finally managed to do this, with the chassis on the powered rail (so I see when I torque the light boards off the connectors), some gentle force (so I don't break anything else), plenty of swearing, some wiggle, and voila ... The shell is on.

This is actually a quite nice model. The inside light effect works ok, though ceiling mounted it would look better. In these photos I didn't yet put the engine cover back on, so the underbody is a bit bare.
I do like how headlight and rear lights change with direction. Quite neat.


So, ... what do I do with an RDC on a Timesaver module? This engine is made to go somewhere and come back. Preferably all by itself. That will be the topic of the next installment.
Tuesday, January 29, 2013
LD/Ops SIG weekend
The Layout Design / Operations SIG meet is a great event, usually on the last weekend of January. Saturday is the actual meet with talks and presentations. This year it was at Harry's Hofbrau, which worked out quite well as a venue. Lunch was included in the admission fee. It was that we didn't have to leave the venue to find a restaurant for lunch. Plenty of opportunity to chat and meet folks during the break.
The program was very diverse. Seth Neumann and Chris Drome presented a fascinating talk about using RFID in identifying cars (and locomotives) for operations, including a technology demonstration. I enjoyed Thomas Knapp's talk about about modeling the facilities of the Pacific Coast Railway at San Louis Obispo. Not only for its historical background and maps, but also because he recreated historical photos on his layout and photographed the model from the same location / angle. It also helps that his models and buildings are very well done. After lunch Dave Falkenburg gave a very entertaining talk about Free-moN, and the Silicon Valley group in particular. This really created some appetite to consider building a module. Dennis Drury's talk about using JMRI Ops to validate layout design was an interesting idea, though I didn't quite buy into it. Finally, Guy Cantwell talked about his Willoughby Line layout, and showed plenty of photos of his nice layout. The official part of the day ended with a panel discussion of how the era of a layout influences operations and vice versa. It was interesting to hear how various people arrived at the theme and setting for their layout and where they took it from there.
After dinner at Applebees, I spent the evening touring layouts with friends. Our first stop was Dave Adams' Durlin Branch of the D&RGW in On3, since it was near the dinner place and no-one in the group had seen it yet. What a surprise! That is one neat layout. Almost completely scenicked, and very well done.We spent almost an hour here, much longer than I anticipated.
Next up was Seth Neumann's Niles Canyon Layout in HO, which I also hadn't seen yet. What struck me about this layout was how the mood of the scenery changes between the industrial areas of Fremont/NUMMI and the Niles Canyon/Pleasanton side of the layout. And of course this layout is tricked out with all kinds of nifty electronics (including the RFID readers), signals, and lighting effects outside and inside buildings. We spent much longer here than I thought, too, not only because the layout was nice, but also chatting with people.
Both Seth's and Dave's layouts are built for operations and should be fun.
We finished the evening at Ed Loizeaux's New York Central, Valley Division. This S scale layout is really made for railfanning with a long double track main line run that winds through the room, a few switching areas, and a small yard (well, as much as things can be small in S scale ...) Several trains ran, and it's quite an experience to watch this long coal drag make its way across the stone arch bridge that forms much of the upper level.
For Sunday I was originally signed up to operate on Bill Kaufman's State Belt layout. That session got canceled on relatively short notice. Instead, I spent the day operating on Jim Radkey's BNSF Pink Lady, which is always a good and fun experience. The group was interesting, and I enjoyed both running trains (Sergeant Hill Local and others), and chatting with the other operators.
Overall, a great weekend. One thing that really struck me this time around was that there _is_ a strong social aspect to model railroading. Since this was the third time I went to this meet, and I'm active at Silicon Valley Lines as well, you get to reconnect with people you haven't seen for a while. ... and they recognize you as well!
Yes, you spent a lot of time in your train room, or the garage, by yourself or in a small group. However, with events like this, I got reminded that there are many others that share this same fascination, and these people are real, not just an email address. I've now met several people in person whose thoughts and advice I've read in mailing lists, or forum posts, for several years. A lot of this is about sharing what you're proud of. The solution to that tricky track geometry problem. This neat technique for scratch building. That awesome scenery effect. Do share and contribute. I'll do my part with this blog, showing my layout, and what I do with it.
The program was very diverse. Seth Neumann and Chris Drome presented a fascinating talk about using RFID in identifying cars (and locomotives) for operations, including a technology demonstration. I enjoyed Thomas Knapp's talk about about modeling the facilities of the Pacific Coast Railway at San Louis Obispo. Not only for its historical background and maps, but also because he recreated historical photos on his layout and photographed the model from the same location / angle. It also helps that his models and buildings are very well done. After lunch Dave Falkenburg gave a very entertaining talk about Free-moN, and the Silicon Valley group in particular. This really created some appetite to consider building a module. Dennis Drury's talk about using JMRI Ops to validate layout design was an interesting idea, though I didn't quite buy into it. Finally, Guy Cantwell talked about his Willoughby Line layout, and showed plenty of photos of his nice layout. The official part of the day ended with a panel discussion of how the era of a layout influences operations and vice versa. It was interesting to hear how various people arrived at the theme and setting for their layout and where they took it from there.
After dinner at Applebees, I spent the evening touring layouts with friends. Our first stop was Dave Adams' Durlin Branch of the D&RGW in On3, since it was near the dinner place and no-one in the group had seen it yet. What a surprise! That is one neat layout. Almost completely scenicked, and very well done.We spent almost an hour here, much longer than I anticipated.
Next up was Seth Neumann's Niles Canyon Layout in HO, which I also hadn't seen yet. What struck me about this layout was how the mood of the scenery changes between the industrial areas of Fremont/NUMMI and the Niles Canyon/Pleasanton side of the layout. And of course this layout is tricked out with all kinds of nifty electronics (including the RFID readers), signals, and lighting effects outside and inside buildings. We spent much longer here than I thought, too, not only because the layout was nice, but also chatting with people.
Both Seth's and Dave's layouts are built for operations and should be fun.
We finished the evening at Ed Loizeaux's New York Central, Valley Division. This S scale layout is really made for railfanning with a long double track main line run that winds through the room, a few switching areas, and a small yard (well, as much as things can be small in S scale ...) Several trains ran, and it's quite an experience to watch this long coal drag make its way across the stone arch bridge that forms much of the upper level.
For Sunday I was originally signed up to operate on Bill Kaufman's State Belt layout. That session got canceled on relatively short notice. Instead, I spent the day operating on Jim Radkey's BNSF Pink Lady, which is always a good and fun experience. The group was interesting, and I enjoyed both running trains (Sergeant Hill Local and others), and chatting with the other operators.
Overall, a great weekend. One thing that really struck me this time around was that there _is_ a strong social aspect to model railroading. Since this was the third time I went to this meet, and I'm active at Silicon Valley Lines as well, you get to reconnect with people you haven't seen for a while. ... and they recognize you as well!
Yes, you spent a lot of time in your train room, or the garage, by yourself or in a small group. However, with events like this, I got reminded that there are many others that share this same fascination, and these people are real, not just an email address. I've now met several people in person whose thoughts and advice I've read in mailing lists, or forum posts, for several years. A lot of this is about sharing what you're proud of. The solution to that tricky track geometry problem. This neat technique for scratch building. That awesome scenery effect. Do share and contribute. I'll do my part with this blog, showing my layout, and what I do with it.
Monday, January 28, 2013

Tuesday, January 22, 2013

Monday, January 21, 2013
Sixth Operations Session on the Welztalbahn
Today was the sixth operations session on the Welztalbahn. Since I had new equipment in service since the last time, I rewrote the schedule from scratch.
I started out with a line-based diagram of where each train is at any point in time. You can see it in my notebook in the photo on the right. Since I created merely a sequence schedule, I didn't need to pay much attention to the speed of trains, and could instead focus on interesting meets. The diagram style format makes it very easy to see when a staging track is too full to hold the trains intended for it.
Then I combined this with the existing train cards from previous sessions, assigned train numbers, printed a couple new cards for the added runs, and created the actual schedule used by the operators. A printout is on the left in the photo.
Once I had the schedule, it was time to stage the trains accordingly. For the passenger trains this goes really fast. Select the locomotive, move the train into the right place. Done. The freight trains tend to need a little bit more attention, but get done pretty quickly, too.
All ready to go. Oh, wait, I do need to add a feeder to the Gregorius track in Talheim. It had no power since the turnout surgery last year. That got done quickly, too. Some track cleaning, and ... The PSX circuit breakers indicate a short? Oh man, did I really not pay attention? Disconnect the track. Short remains. Disassemble all of Kopper Sidings. Short remains. Disconnect track from the PSX. Short indicator remains on (!) ... Deeep breath. ... Power-cycle the layout. ... WTF? Now all THREE PSX circuit breakers indicate a short!!! Why now? I have two hours until my operators show up, and I have a short in the layout? But where? ... Deeeeep breath. ... This doesn't make any sense. I didn't change anything, and there's a short? Even with disconnected track? .... Hmmm, bad command station? Overvoltage? ... Replaced the Intellibox transformer (yes, I had a spare 16V AC transformer). Turned the layout back on, and ... no dice. No PSX delivers power to the layout. I connect track power of one block directly to the Intellibox. No problems running a train. I reset one of the PSXs to factory default. Didn't help... Some time later Balazs showed up, we look at the problem, and just as mysteriously as it showed up, the "short" disappeared. I still have no idea what this was. I have an email out to DCC Specialties, maybe they've seen this before.
Anyways, a little while later the operations sessions was in full swing.
As for the Kopper sidings, the new track at Gregorius worked as well.

Overall, the layout performed quite nicely today. A few dead spots on the industry tracks, and a short on the turntable, but otherwise no mechanical problems. The revised control panels seemed to make sense, too ... at least I got no complaints :-)
This session ran for 2.5 hours and all 17 scheduled trains ran with no problems. I think that's a first.
One good question I got today was, "do you operate your layout only twice a year?" -- No. I operate more often than that just by myself. However, I don't count my one-man shows as an operating session, since I usually run with a simplified schedule that includes only certain freight trains.
 |
| Printed schedule, train cards, and line schedule |
Then I combined this with the existing train cards from previous sessions, assigned train numbers, printed a couple new cards for the added runs, and created the actual schedule used by the operators. A printout is on the left in the photo.
Once I had the schedule, it was time to stage the trains accordingly. For the passenger trains this goes really fast. Select the locomotive, move the train into the right place. Done. The freight trains tend to need a little bit more attention, but get done pretty quickly, too.
All ready to go. Oh, wait, I do need to add a feeder to the Gregorius track in Talheim. It had no power since the turnout surgery last year. That got done quickly, too. Some track cleaning, and ... The PSX circuit breakers indicate a short? Oh man, did I really not pay attention? Disconnect the track. Short remains. Disassemble all of Kopper Sidings. Short remains. Disconnect track from the PSX. Short indicator remains on (!) ... Deeep breath. ... Power-cycle the layout. ... WTF? Now all THREE PSX circuit breakers indicate a short!!! Why now? I have two hours until my operators show up, and I have a short in the layout? But where? ... Deeeeep breath. ... This doesn't make any sense. I didn't change anything, and there's a short? Even with disconnected track? .... Hmmm, bad command station? Overvoltage? ... Replaced the Intellibox transformer (yes, I had a spare 16V AC transformer). Turned the layout back on, and ... no dice. No PSX delivers power to the layout. I connect track power of one block directly to the Intellibox. No problems running a train. I reset one of the PSXs to factory default. Didn't help... Some time later Balazs showed up, we look at the problem, and just as mysteriously as it showed up, the "short" disappeared. I still have no idea what this was. I have an email out to DCC Specialties, maybe they've seen this before.
Anyways, a little while later the operations sessions was in full swing.
 |
| Itamar works the Yard in Emsingen |
 |
| Balazs shuffles cars in Talheim |

Overall, the layout performed quite nicely today. A few dead spots on the industry tracks, and a short on the turntable, but otherwise no mechanical problems. The revised control panels seemed to make sense, too ... at least I got no complaints :-)
This session ran for 2.5 hours and all 17 scheduled trains ran with no problems. I think that's a first.
One good question I got today was, "do you operate your layout only twice a year?" -- No. I operate more often than that just by myself. However, I don't count my one-man shows as an operating session, since I usually run with a simplified schedule that includes only certain freight trains.
Sunday, January 13, 2013
Birthday present
Pascal built me this awesome wooden steam locomotive from scratch as a birthday present. He did an excellent job. No power tools were used just saws, knives, files, a hand drill, hammer and nails.
 I love the extra touch of modelling live steam from the chimney.

Saturday, January 12, 2013
Digitrax DN143K2 in N Scale Kato RDC
The office layout is in N scale. Due to a spur of the moment purchase a Kato RDC found its way to me. I'll write more about the purpose of this guy some other time. Tonight I installed a DCC decoder in the RDC . What a giant pain for such a small model. The model is held together only by clips. Disassembly is impressively hard. Keeping the clips intact is even harder. Either way, after reviewing forum posts, the Kato disassembly instructions, and the Digitrax installation instructions, the decoder is ready for testing on the layout.

Following some forum advice I removed the underbody part to reach the clips for the seat panel more easily. That was a very good move.
The Digitrax product description did say this is a challenging install "due to the nature of the model". I guess I'll find out soon if I can manage to do challenging installs successfully. Update 1/29/2013: I tested the decoder on the layout in the meantime. One light board was slightly off the connectors (easily fixed), but otherwise the RDC ran just fine. The motor parameters do need some tuning. Though that can be easily accomplished when it's put together.

Following some forum advice I removed the underbody part to reach the clips for the seat panel more easily. That was a very good move.
The Digitrax product description did say this is a challenging install "due to the nature of the model". I guess I'll find out soon if I can manage to do challenging installs successfully. Update 1/29/2013: I tested the decoder on the layout in the meantime. One light board was slightly off the connectors (easily fixed), but otherwise the RDC ran just fine. The motor parameters do need some tuning. Though that can be easily accomplished when it's put together.
Monday, January 07, 2013

Thursday, January 03, 2013
Tuesday, January 01, 2013

Saturday, December 29, 2012

Sunday, December 23, 2012
Half-timbered houses for Emsingen
A few more half-timbered houses that will grace the market square in Emsingen.


Sunday, December 02, 2012
Office Switching

The Timesaver for now lives on top of my bookshelf at work. Hmmm, some kind of background would fit nicely here...
Wireless Emergency Alerts
This morning we were woken up at 8:17am (groan "It's Sunday morning!") by my cellphone reading out an emergency alert about flooding in my area. Yes, it's raining, but why is my cell phone talking and showing this really unfamiliar notification box with information that there's local flooding and I should listen to local media?
Before my brain really kicked into gear, I clicked OK ... and then realized I should have taken a photo of the alert for this blog...
Turns out this is a new federal warning system. Verizon's website has more information about the "Wireless Emergency Alert" system that was installed and enabled this year.
Before my brain really kicked into gear, I clicked OK ... and then realized I should have taken a photo of the alert for this blog...
Turns out this is a new federal warning system. Verizon's website has more information about the "Wireless Emergency Alert" system that was installed and enabled this year.
Wednesday, November 28, 2012
Emsingen town arrangement -- first experiments
I cut a base board for the town of Emsingen the other day, and have been playing with house arrangements. I clearly need more houses, but this is starting to go somewhere now..

It's quite interesting how things appear more complete at eye level. Compare to this overview shot...

There will be a street leading up to the town roughly where the blue clamps are, as well as more houses in the back and to the left. The area near the stub track will get a loading dock, access road, and the Emsingen freight house.
Friday, November 23, 2012

Monday, November 19, 2012
Saturday, November 17, 2012
4 story houses in Emsingen ... or not.
I'm currently building more houses for the town of Emsingen. One of the kits I got for this a while ago is Faller's 130436 half-relief, background houses. I like the idea of half-relief houses since one doesn't need as much space as for the complete house, while still giving the impression of "there's more".
These two houses are the 4-story variant. The kit was an impulse buy, and I didn't really consider how high 4 stories is, nor the feel of Emsingen town. As time progressed and first houses were set on the layout, I took another look at that kit and mused that 4 stories is quite high. When I started building the kit I kind of spaced on this earlier insight. After the ground floor was built and I placed the house on the layout, it felt like a sky scraper, and completely out of place. Some kit-bashing was in order. Of course, by now I already had glued together the ground floor, so I couldn't go the easy route and do a nice straight cut along the bottom of the side-walls, instead I needed to cut at the roof line.
In the photo below I already shortened one of the two side-walls, and am test-fitting the facade, while the wall in the rear is still the original height.

Here's a view of the almost completed kit with other houses in Emsingen...

Yep, that works much better. Just imagine there were another floor in that house. It would be almost as high as the church steeple.

Friday, November 16, 2012

Sunday, November 11, 2012

Thursday, November 08, 2012

More box cars
I was lacking a sufficient number of "real" box cars ("Gedeckte Gueterwagen") so Maerklin's new 2012 release of the 00776 display set came at the right time. Robert Frowenfeld from rjftrains had a good pre-order deal so I jumped on it in February. The shipment came in today.
These are Gbs 256 sheet piling wall box cars, not exactly one of the most common cars around on the prototype, but a good example for modern cars in the late 60's and early 70's.

The cars look really good as far as brown freight cars go. The molding is nice and crisp. Lettering sharp, legible, and as far as I can tell correct. Grab irons are present and iirc in the right places. Maerklin also molded the brake handles, though as usual didn't get the release valve handles correct (they are mirrored when they shouldn't be). I'm sure the rivet counters will be all up in arms about that. Some cars in the set are factory-weathered. The weathered look is nice, but I'll hold judgement until I see them on the layout.
I can now retire some of the really old box cars I'm running on the layout, but will need to revisit maximum train length. The new cars are quite a bit longer than the somewhat compressed cars from yesteryear. It might turn out that a 9 car train is now too long for the sidings and storage tracks.
These are Gbs 256 sheet piling wall box cars, not exactly one of the most common cars around on the prototype, but a good example for modern cars in the late 60's and early 70's.

The cars look really good as far as brown freight cars go. The molding is nice and crisp. Lettering sharp, legible, and as far as I can tell correct. Grab irons are present and iirc in the right places. Maerklin also molded the brake handles, though as usual didn't get the release valve handles correct (they are mirrored when they shouldn't be). I'm sure the rivet counters will be all up in arms about that. Some cars in the set are factory-weathered. The weathered look is nice, but I'll hold judgement until I see them on the layout.
I can now retire some of the really old box cars I'm running on the layout, but will need to revisit maximum train length. The new cars are quite a bit longer than the somewhat compressed cars from yesteryear. It might turn out that a 9 car train is now too long for the sidings and storage tracks.
Tuesday, November 06, 2012

Saturday, November 03, 2012
Timesaver in N-scale

Last year I started to build an N-scale version. That project fizzled after a while, and the module was stored in the garage for most of last year. The baseboard is only 1 x 5 feet, so it wasn't much in the way, and, as can be seen on the photo, that leaves plenty of space for "scenery".
The module is fully wired up and operational. The Rapido couplers on my existing N-scale cars were not very good for switching, so I installed Microtrains trucks with knuckle couplers to match the little Diesel switcher. Replacing the trucks was reasonably easy on most cars.
This afternoon I sat down for a little while, cleaned tracks, hooked up power and indeed, the little thing actually works. It has some minor connectivity issues that should be easily fixable with some soldering and a couple extra power feeds.
Now, ... the point of the Timesaver is to act as a switching puzzle. I needed a way to define where cars are supposed to be spotted. I used Lego bricks on the Bauspielbahn-Timesaver a few years ago to give each car a color identity, and randomly placed matching Lego bricks at the loading spots.
For the N-scale version I wrote a script that shuffles assignments and delivers the result on a Web page in ASCII art. Not pretty, but functional and perfectly sufficient for the purpose.

Subscribe to:
Posts (Atom)