Showing posts with label kit bashing. Show all posts

Sunday, February 21, 2021

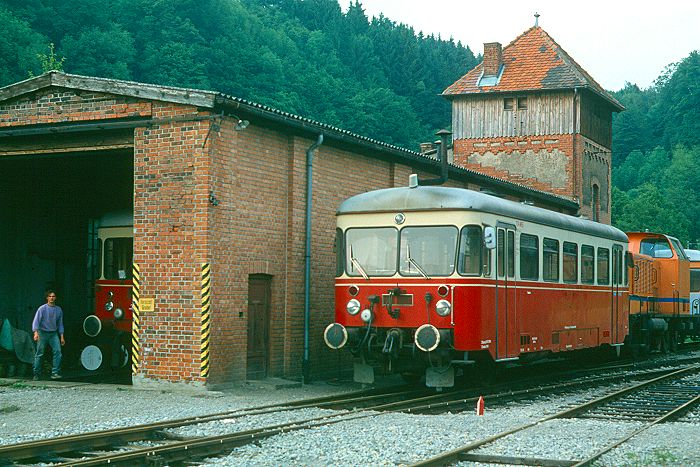
Untergroeningen Locomotive Shed (14)

[ Untergroeningen posts ] 

[ part 13 ]

In the last couple days I focused on the roof and adding some building details. I cut the Auhagen corrugated roof pieces to size, added gutters I made from U-profile ABS, and primed the lot with Tamiya primer.


I used old PollyScale CSX Gray to paint the roof. The paint reacted with the primer and produced a nice irregular weathering pattern. I decided to leave that and followed up with a light application of gray and light brown weathering powders. A strip of 0.060 x 0.080 Evergreen styrene covered with a strip of 0.010 x 0.125 styrene works well as roof ridge.


Next I turned my attention to the roof of the machine shop. After test fitting on the module, I decided that cutting the roof at an angle to line up with the backdrop as originally planned is not necessary and I could cut the roof edge at the long wall of the shed.


Then it was time to face the fact that the wall I made for the machine shop is too short. Close review of the prototype photos confirms that the wall should go all the way up to the wooden part of the water tower. I did not want to redo this part of the model and decided to work around the problem.


I needed to close the gap between the top of the separation wall and the roof. The triangular wall piece I glued to the separation wall is somewhat visible in the photo below.


Finally, the machine shop roof is in place.


I added first details, like gutters, flashing, and faceboards. I'm getting tired of working on this model, so this is good enough for now and I'm turning my attention to a very different project area.

The locomotive shed is now planted on the Untergroeningen module. Some more work is needed around the foundation, so that the building is not floating above ground. I also need to add steps for the side doors.

Tuesday, February 16, 2021

Untergroeningen Locomotive Shed (13)


Yesterday, I glued together the shed walls, primed and painted the roof trusses and glued them to the walls. I started working on the roof sheets, but before I can fit them, I need to glue the water tower to the building body. And before I can do that, I had one more window I needed to add.

Drilling a hole, and cutting out the window opening with the nibbler is easy, but requires care and attention.

The window frame and support pieces were already painted yesterday, so I just needed to do a few touchups around the frame and the wall opening to make it look nice.


Finally, the big moment gluing the parts together. Contrary to pictures I showed in the last few days the building is now glued into one piece. 

Sunday, February 14, 2021

Untergroeningen Locomotive Shed (12)

 [ Untergroeningen posts ]


With the window openings cut on the interior walls yesterday, I started today with spray painting the walls a nice faded, yellowish offwhite color.


I mixed this from 12 parts white, 3 parts grey, and 1 part yellow. The airbrush helped with creating the uneven, slighly messy look I was after.


I glued the windows into the walls using Testor's Clear Parts Cement, carefully aligned the interior walls, and glued those as well. A few bottles of paint help keeping everything aligned.


While the glue set on the walls, I painted the inset walls of the water tower in PollyScale Mud. I also painted the wood beams of the shop walls in dark brown, stained the wooden top of the water tower, and painted and installed the side doors.


Next up was building the roof trusses to support the roof. Since I need at least 4 trusses, I made a simple jig from styrene. The trusses are built from Evergreen 0.060 x 0.080 styrene strip.


I temporarily set up the walls and put the trusses in place to get an idea what it looks like. ... Yep. Looking good.


It's a pity that the trusses will be barely visible when the locomotive shed is installed on the module.


The plan so far was to keep the building removable and build walls, water tower, and roof into a single unit. I'm now contemplating to make the roof removable separately. I have a some time before I need to decide that. The large windows and the large door opening allow bystanders a look into the building in any case.

Saturday, February 13, 2021

Untergroeningen Locomotive Shed (11)


The locomotive shed has large windows and I'm planning to eventually add interior lights and furnish the inside. For that to look nice, I need to add interior walls, so that the rear side of the Auhagen panels and the window plastic is hidden away. I used the outside wall as template to scribe the outline of the wall and the window openings on 1/8" styrene sheet.


I scribed the lines deeper along a metal edge and cut an X into the window openings to snap off the inside pieces. I cleaned up the edge with the Xacto knife and emory board. 


The view from the "inside" with the windows loosely put in place is coming out exactly as I had hoped for. The 1/8" sheet is thick enough that you can see the inside ledge of the wall through the window from the outside.


With one wall finished, I made the second wall the same way. Now that I was confident in what I was doing this went much faster.


I'm planning to paint the inside wall a dusty off-white. Will need to take a look at my paint stash for a good color match tomorrow.

Friday, February 12, 2021

Untergroeningen Locomotive Shed (10)

[ part 9 ]

As I was messing around with the mortar wash I decided that the red plastic base was just too red to get the colors I was after during weathering, so off to the paint booth I went and airbrushed the wall panels and water tower. 


I used Vallejo 71.037 as the base, and a light overspray with 71.033. The latter was completely pointless, as you will see in a minute, but looked nice in the paint booth. The insets of the water tower will be brush-painted with PollyScale Mud at a later time.


Then I went to town with washes to create an uneven and varied look for the bricks. I used washes from Mud, Flat Cement, Red, Orange, and Light Rust, starting with 50:50 color to water, and a bit more watery as the experiments went on.


I also varied techniques along the way. At first I wiped off the wet washes of the horizontal panels to get more definition of the mortar lines. Next I let the washes sit for longer periods of time before wiping off. I was not too happy with the results after wiping, due to too much streaking, and too much color ending up in the paper towel. I switched to dabbing on various washes in a camouflage pattern, and carefully picking up the excess with a  paper towel. For the next variation I dabbed on some wash, and moved the panel around so that the wash flows over the surface, creating more varied patterns and color intensities.
Finally, I went over everything with the mud wash again to bring out the mortar lines and "drained" the wash towards the lower side of the panel.


I repeated the same process on the water tower. Finally, I applied a light dusting of PanPastels Light Rust with a makeup sponge to get a slightly warmer brick color. Here's the result on the Untergroeningen module. Next I should use color pencils to mark individual bricks in different colors. I might do that at a later time.

Sunday, February 07, 2021

Untergroeningen: Locomotive Shed (9)

[ Untergroeningen posts ] 

[ part 8 ]

This weekend I wanted to make progress on the locomotive shed. I started with sizing out the sidewall for the machine shop behind the shed. I have almost no photos from what the shop looked like in Untergroeningen, but I do have photos of a model of a similar WEG facility, which gave me a better idea of the wood frame pattern used. Sadly, I don't have much space on the module to show much the shop. It will be mostly hidden behind the water tower. I measured the space and cut a template from paper to make sure I got the dimensions right before cutting it from plastic. 


I compared the photo above to a similar perspective at Vergessene Bahnen (bottom of page) and decided that my building is too tall. I knew that before, but it's just too much. So I cut off 6mm brick foundation from the bottom the Auhagen pieces, which is about as much as I can take off before the windows start to look silly. They are still too big compared to the original, but if I wanted to change that, I need to build the whole thing from scratch.


Removing the foundation meant that I had to replace the wall section with the door I made last May and cut a new door opening. Getting the shape of the brick arch above the door right took quite a bit of time. The old section is in the upper right of the photo.


I applied a first wash from thinned Testors Flat Cement for the mortar lines, and let everything dry over night.

Sunday, July 05, 2020

Untergroeningen: Locomotive Shed (8)


[ part 7 ]

While the ballast dries, I'm working on the floor of the locomotive shed. The idea here is that the floor will be permanently mounted to the module, while the locomotive shed will remain removable, at least for the time being.

The floor will get a concrete look with the rails embedded in the (styrene) concrete. The flangeways need to be quite wide to conform with NEM 340. The single Code 40 rail will provide power to the locomotive. I'm hoping it will be less obstrusive when the floor is painted.
[ part 9 ]

Wednesday, July 01, 2020

Untergroeningen: Locomotive Shed (7)

[ part 6 ]

With the mainline track in place, I can finally figure out exact placement of the locomotive shed on the module. This also sets the parameters for how much of the loco shop I will be able to build. (Spoiler: Not a lot.)

I tested clearance with the longest car I have, the middle car of a BR 614 DMU. My rendition of the locomotive shed came out a little bit too tall overall. I might have been better off scratchbuilding the building altogether. Oh well, it should still be a fine building once completed.


Because of the non-prototypical curve to the Welztalbahn connector, I had to angle the locomotive shed away from tracks a little bit, which in turn requires a slight S-curve in the track leading to the shed, which -- to my utter surprise -- is also present in the prototype track arrangement. Cool!

[ part 8 ]

Monday, May 25, 2020

Untergroeningen: Locomotive Shed (6)

[ part 5 ]

After I went through the rather involved experience of cutting Auhagen BKS panels for the water tower in part 3 with an xacto knife, I remembered having read about how "nibblers" make cutting window openings much easier. I'm still planning to scratchbuild / kitbash the Untergroeningen station building and certainly was not in the mood to make the dozen plus windows I will need the same way I made the cutouts on the wall sections. It looks like there are only a couple models of nibblers out there, normally intended for cutting thin sheet metal. Should work fine for plastic. So I ordered the more common model.


I tested the tool with a scrap wall panel and installed an Auhagen door in the scrap piece. With a little bit of practice I was able to make straight cuts. Alright, moving on to the panel where it matters. Based on a prototype photo I chose the smaller Auhagen door for size and marked the location on the panel.


In less than a minute I cut the door opening. So easy. Yes, I can do the windows this way. Phew.


The brick arch over the door is a little bit more involved. I carefully scribed the edge of the arch on the brick panel, and then scribed it a bit more, so the edge is easier to see.


I used the nibbler to cut as close to the scribed line as I can get and then carefully enlarged the opening with a variety of files and emory board until the arch fit in the opening. On the scratch piece I did a better job matching the curvature of the opening to the arch. Here I ended up with an unsightly gap above the arch, which I carefully filled with wood glue. Elmer's White Glue should work as well, but I prefer the slightly more gooey consistency of Titebond II applied with the tip of a tooth pick.


Right. I'm done here.


... or am I? Another look at the prototype photo confirms that the door doesn't really fit. Let's build something that's more similar to the door of the prototype. The Auhagen door has a good size, so I just need a different boarding pattern. For starters I cut a the door shape from styrene. 


... and then decided that starting with a V-Groove pattern sheet (such as Evergreen 2025) would be easier, so I threw the styrene piece away and started over. I used 0.10" x 0.40" and 0.10" x 0.60" Evergreen styrene strips to make the door pattern.


And the result is a much better match for the prototype. I taped the door in position for safekeeping until it is time to paint the shed.

[ part 7 ]