

Wednesday, February 27, 2019
Monday, February 25, 2019
Butterfly Season?

The Monarch Butterfly population today is much smaller than 20 years ago. So it makes me happy when I see one, even though this guy looks a bit tired.
The sun was hiding behind clouds, and it was quite cool this morning. I hope he found a comfortable place to rest before embarking on his migration north.
Sunday, February 24, 2019
Papermill: Conveyor Transition Housing

Back in October last year, I built a temporary base from paper for transitioning the large digester conveyor belt into the backdrop. The idea is to let the conveyor end in some kind of housing made from corrugated metal, similar to the conveyor cover. Since the paper mockup worked well, I transferred the wall shapes and sizes to Evergreen Styrene sheet and built the housing. I used Evergreen 4526 "Metal Siding" in 0.040 thickness, which is thicker than I'd like, but given that this is a background building, I'm not loosing any sleep over it.
In the rear of the housing is a stub conveyor piece that "extends into" the backdrop. This is barely visible from the aisle, so I was mostly after suggesting there's something there.

Test-fitting the conveyor with the new housing.

Primed. Ready for paint and weathering.

Saturday, February 23, 2019
Roller Stand Case

I have a roller stand from KPF Zeller that I really like. It's simple, functional, and reasonably cheap. However, it doesn't come with a case. So I built one tonight from 5mm MDF.
It was important to me that the case fully surrounds the roller stand, is sturdy yet easy to open, and provides easy access to the wheels of a locomotive under test. My solution is to have a hinged lid that includes one of the side walls.
I primed the MDF and then drilled holes for 4mm banana plug sockets on one end and

I have the long version of the roller stand, and a couple extra rollers. This is long enough so that I can test an EMU or DMU without having to separate the units, and I have enough rollers to support Maerklin's BR53. To limit vibrations I glued pieces of foam rubber into the case and then glued the roller stand to the rubber.

I still need to get appropriate hinges and some kind of clasp for the lid.

Join ETE!

For a couple years now, I'm a member with the European Train Enthusiasts (ETE). A friend brought an ETE flyer to today's ops session at Silicon Valley Lines. It's nicely done, looks good, and comes with some neat photos.

Huh! ... Wait a second. The friend points to the photo at the bottom. Unbelievable! That's me. With Tatjana apparently, so that must have been at a Eurowest Show in about 2004.

Silicon Valley Lines: February Ops

Franziska joined me again for Ops at Silicon Valley Lines today. Here she is running train 99b, a passenger run from Bayshore to Tracy. We got a glimpse of the exclusive membership at Vampire's Rest.

Thursday, February 21, 2019
Welztalbahn: Draft Environmental Impact Report for layout extension

The grey blobs represent storage cabinets that can be moved if necessary, but do need to remain in the garage. The brown blobs are shelving units that need to remain in place and can not be used for the layout. The redish blob on the left is my work bench.
On the Murrbahn layout, Untergroeningen will be a terminal station, but since the prototype station was originally planned for a possible extension towards Aalen, the track layout works as through station as well.
The Untergroeningen module connects with the existing Welztalbahn layout on the south-side of Emsingen where I investigated turnout trouble last week. From the new turnout track proceeds in a wide curve through the wall to the pointed end of the Untergroeningen module. The module will be built into IKEA Hejne shelf units. The light yellow sections of the module will be built into the shelf unit, while the orange section will be removable, and installed only when operating the layout. Attaching Untergroeningen to the Welztalbahn this way will be Phase 1 of the project. Untergroeningen will expand the operational possibilities of the Welztalbahn and can be operated as a branch line terminus, or even take over the role of the imagined Prechtal destination currently represented by a single staging track on the Welztalbahn. Untergroeningen by itself does not add any additional staging, so in Phase 1 I continue to rely solely on the Welztalbahn staging tracks.
Phase 2 will add 3 Hejne units across the aisle from Untergroeningen to host Gaildorf/West and connect it with a wide curve to Untergroeningen. Again, the orange section is removable, as is the curve. With Gaildorf/West and Untergroeningen the branch can support quite a bit more activity and likely keep a third operator busy for a complete session. The freight yard at Gaildorf/West would be used for end-of-line staging and building / breaking up trains as needed.
Finally, Phase 3 would add a temporary staging yard on top of my work bench. This would significantly expand the staging track capacity for the layout, open up possibilities for more through trains, as well as different routing for local freight trains. The expanded possibilities for car routing would likely overwhelm the small yard at Emsingen and I expect to revise car routing completely if and when Phase 3 gets built.
This Draft Environmental Impact Report was conditionally approved for Phase 1 by the local Land Use Committee. I will build Phase 1 and then submit Phase 2 for approval.
Wednesday, February 20, 2019
Anticipation (part 2)

My second long distance model trains order within 3 months arrived today. With another package that should arrive tomorrow, I'm about to have the parts for the next project, and then some...

Darkness comes upon us

When I got off the bus today a massive deep-black thunderstorm cloud was hanging over Mt. Hamilton, and slowly moving towards us. We rarely get clouds this dark. Usually, it's at most dark shades of grey.
Monday, February 18, 2019
Back Over the Hill

Stop & Go traffic on Highway 17 south of Lexington Reservoir after I dropped off eldest daughter in Santa Cruz. The end of a busy weekend.
Sunday, February 17, 2019

Saturday, February 16, 2019
Module 1: Grass!

While Streckenende is drying, I pulled out Module 1 and continued working there. I have no grass fibers that look like dried long grass, so I went for the next best thing: burnt grass. Mixed with Scenic Express Late Summer and Noch Wildwiese fibers I arrived at a lighter grass tone and used that for the track embankment.

Between the tracks and the grass should be a bit flat exposed earth where almost nothing grows due to weed control spraying. I used some fine dark sand I collected years ago at the beach for that. This sand strip needs to be glued down before applying grass on the embankment. The other way around doesn't look particularly good, and needed a bit of effort to fix.
Next I applied a thin layer of real dirt from our garden to the flat area, soaked in Matte Medium and dapped with an old paint brush for more texture. While that is still wet, I applied a mix of Scenic Express 2mm Late Summer fibers, Noch Wildgrass 2.5mm, and some Noch medium green 5mm fibers. I'm planning to add some conifers on the dirt hill and applied some forest ground cover.

I repeated the procedure on the other side, and added a small service road that terminates near the tracks. I want the drainage ditch to be a bit darker with more body, but not substantially different from the surrounding meadow. For now I started out with Scenic Express Late Summer and a more generous helping of Noch medium green 5mm fibers. As a side effect it nicely pulls together the embankment and the meadow. The ditch on the left is not done yet.

Let's see what this looks like tomorrow when glue is all dried up.

Streckenende: Grass!

The glue needs to dry, but this is going in the right direction. I'm trying to vary colors and texture. I might add an additional layer of gras and flock next, then it's time for bushes.

Heavy Rain

We were supposed to go skiing this weekend, but ended up not going amid all the chaos the storm caused in the Sierras. Rain front after rain front moved through the region since yesterday. I'm glad we stayed home. It's no fun driving today.
Thursday, February 14, 2019
Streckenende: Paint, flock, and more Scuptamold

I painted the Streckenende module earthbrown, and sprinkled some Woodland Scenics Fine Turf into areas where water will collect. Then I remembered that I wanted the edges of the roadbed sloped and mixed up some Scuptamold to make it so. Of course, I made too much, so I touched up a few more spots that didn't flow well. Sigh. No grass tonight. No ballast either.
Rain

Rain last night...
Rain this morning ... and there's still more rain to come.
Looks like this February is about to get wet, but not as bad as the infamous February back in 1998 when San Jose got over 10" of rain in one month (5 times normal).
Tuesday, February 12, 2019
Welztalbahn: Track Repairs

The approach to the south turnout at Emsingen station has always been a bit problematic. Some cars or locomotives would derail here and I couldn't quite figure out why. Since this is the location where I'm planning to add a turnout towards a modular expansion of the Welztalbahn, I decided to take another look at this. I noticed before that cars with DC wheelsets tend to have trouble here, while the Maerklin "pizza cutter" wheel sets never had problems. I figured that the problem would likely be related to track alignment and how the wheel sets navigate the transition from the uphill grade into the station.
The ESU BR 215 reliably had trouble here as well and likes to go straight over the points instead of heading left to stay on the mainline, so it's a nice guinea pig to test with.
It turned out that there was a slight vertical kink at the end of the grade just before the turnout which was sufficient to send the wheels a bit higher on the points and there isn't enough flange on these wheel sets to counter this motion. I removed the ballast on the curve leading into the turnout and experimented with vertical track alignment so that the short track piece next to the turnout was horizontal with the turnout, and the grade ends a couple inches before the turnout. That seems to have done the trick. At least the BR 215 has now passed through this spot at full speed several times without any difficulties, when before it would derail even at slow speed. I call that good enough for now.
Monday, February 11, 2019
Streckenende: Terraforming

I turned the boring flatness of pink foam into a somewhat hilly landscape today. The first step was to think through what ground features I wanted where, then mark the scenery outline on the module edge, and cut it out with the jigsaw.

Five minutes not-so-gentle carving with the basket rasp turned the pink foam into a rough outline of what I had in mind.

I mixed Scuptamold with brown paint and water, and smoothed out the ground with an artists spatula. The large, wide spatula works really well for general, flowing scenery, while I prefer a small pointed spatula for steeper hills with sharper rock outcroppings like the one at the Tiersteintunnel portal.

Sunday, February 10, 2019
Streckenende: Making a proper module

A month ago I used one of Harald Brosch's laser cut module ends to experiment with home made Maerklin track. I figured that if this doesn't work out, not much is lost, and if it does work, I can experiment with Fremo modular connections some more. This all worked, so I decided to make this a proper end module with track bumper and scenery.
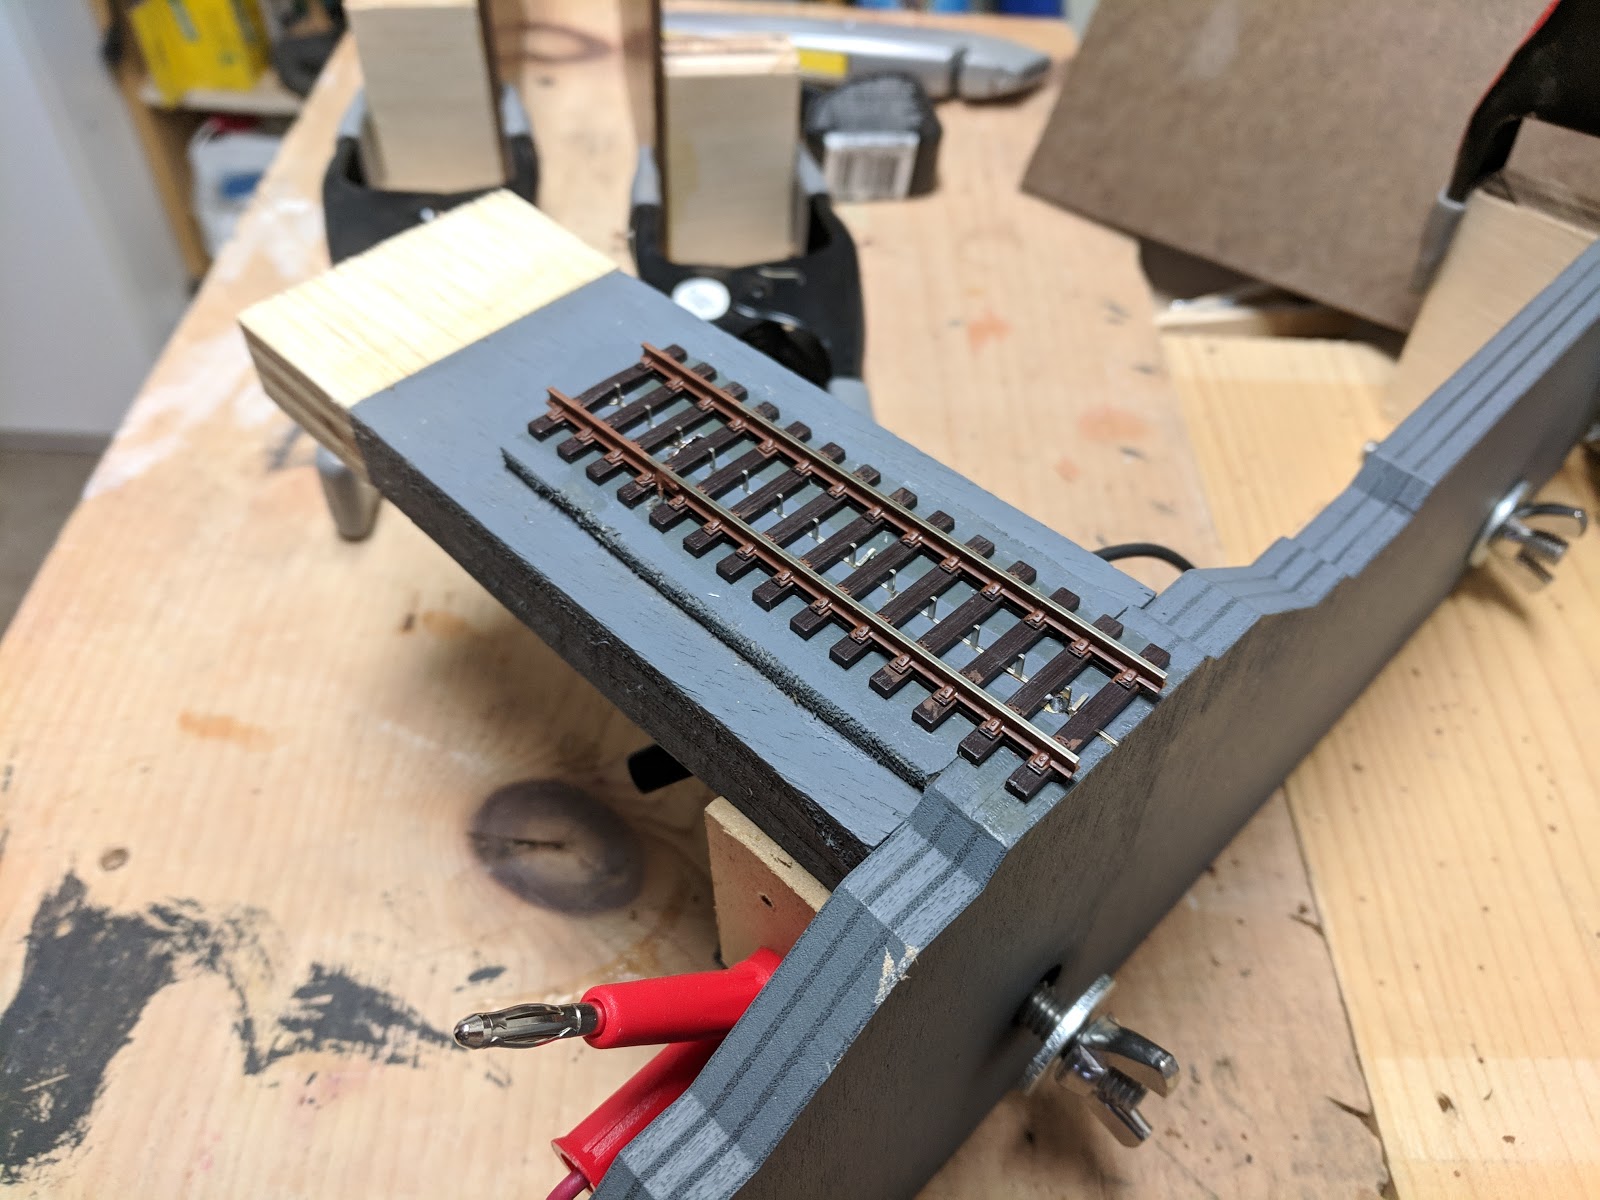
I brush-painted the track with two coats of Model Master Leather, which has a pleasing color surprisingly close to what rails look like when they're weathered a bit. I measured and cut hardboard sides and started glueing pieces together.

After rummaging through my stash for a while, I finally found the bumper from Faller's B-141 kit I had put aside for "I may need this in the future at some point". With a slight extension of the track base it fits quite well to the end of the track.

This is a fairly old plastic kit and it needed some modifications. First thing was to cut off the Maerklin-style car bumpers, and cut a small hole under the bumper board for the coupler. I used some styrene to build a box behind the hole.

The box is supposed to be filled with old ballast, but the kit's version is quite crude.

I put a thin layer of Woodland Scenics Brown medium ballast over the top and it looks much better already.

Finally, I dry brushed some white on the bumper board, as well as marked where car bumpers left their prints. The box got some dry brush treatment with lighter and darker browns, as well as a coat of India ink wash to pull it all together.

Saturday, February 09, 2019
Welztalbahn: Turnout control repairs

One of QuadP servo decoders I use on the Welztalbahn lost its mind a little while ago, which caused it to not only forget its address, but also the servo programming. Hence all servos returned to their neutral position. In one turnout I didn't pay enough attention during install and the neutral position was away from the turnout hole. As a result the actuating rod from the servo popped out of the turnout throw and I spent two hours today fixing that, as well as reprogramming all four turnouts.
This QuadP is the first servo decoder I installed on the Welztalbahn. When installed originally, it was easy to reach and very convenient. However, with Emsingen station built, tunnel walls, scenery etc. it's now quite hard to reach when trying to see turnout points for alignment. That made it much harder to get those turnouts back into working order. Lesson learned: Mount those control boards in locations that are easily reachable even after the planned scenery is built.
Meanwhile, Tam Valley Depot followed through on my wish and released the QuadLN-S decoder which has LocoNet, as well as support for a remote alignment tool. Looks like it's time for an upgrade.

Wednesday, February 06, 2019
Dave Parks' Cumberland West - Evitts Creek Yard (take 2)

Tonight I'm running Evitts Creek Yard again. This is a fun job on the B&O with a nice variety of roles. The Yardmaster runs the Brunswick turns from and to Staging, classifies cars, originates and terminates several locals and transfer runs, as well as coordinates block transfers with Williams Street Yard. Light engine movements for these trains need to be coordinated with the Tower Operator at Evitts Tower. A very enjoyable experience with a very nice group of model railroaders.

The B&O main line is on the left of the photo with the west-bound main occupied by a 40 car loaded coal train. Quite a sight when that rolls by. Evitts Creek Yard is in the center of the photo. MY Tower is on the right, next to the Western Maryland main line into Staging. Knobmount Yard on the far right builds and breaks up coal trains on the WM.
Sunday, February 03, 2019
Module 1: Terraforming (2)

I again used the basket rasp to shape the pink foam and Scuptamold to blend it together, followed by sandpaper to even out the edges. The photo below was taken when the Scuptamold was still wet.


While at it, I painted the module top earth-brown.

Tonight I started to ballast the track. The center studs are more visible than I'd like, but let's see what it looks like when I'm all done.


Subscribe to:
Posts (Atom)