Friday, July 31, 2020

Untergroeningen: A Case for Segment One


This afternoon I turned a sheet of 1/8" hardboard into a case for Untergroeningen segment one. Now I can store it with the other modules in the storage rack in the garage, instead of having it take up space in the train room. 


You can never have too many clamps. I'd like to protect the underside better, but this will do.


All packed away.

Santa Teresa County Park Hike


Another morning hike in friendly company at Santa Teresa County Park. It was overcast, but I'm not complaining as it kept air temperature low for most of the hike.  The Bay Area's golden brown is now in full swing even with only a moderately warm July.


As we left the parking lot, a flock of wild turkeys was having breakfast nearby.

Wednesday, July 29, 2020

SVL: Audio Cable for FRS radio


When I last played with connecting an FRS radio to the computer, I didn't connect the radio directly to the computer, because a) I didn't know what the pin-out of the radio was, b) I read that connecting line out to microphone input can blow the microphone circuit, and c) I didn't have enough time to test things out.

In the meantime I learned that connecting output to microphone input works if you are careful with volume levels. I also found out what the pinout of the headset plug in my Motorola Talkabout EM1000R is. Hence, tonight I sat down and butchered some cables. The wiring is very simple:


The Motorola EM1000R FRS radio has a 2.5mm plug with a shorter than normal shaft, i.e. only 2.5mm plugs specifically designed for this (and similar) radio fit. I solved that problem by cutting the plug off my crappy and uncomfortable Motorola headset purchased years ago. The photo below shows the cable in operation with separate microphone and stereo 3.5mm plugs. The wiring works similar to the 4 pole TRRS plug: Ground at the shaft, and signal (Mic or Left) at the tip of the respective 3.5mm plug.

Saturday, July 25, 2020

Comet NEOWISE


On our second attempt this weekend, we did get to see Comet NEOWISE. Despite all the hype, so far I hadn't bothered to try and catch it. Tonight Tatjana and I drove out to Barker Pass, which has nice open views near the Pacific Crest Trail trailhead.
And indeed after sunset, as the sky darkened and the stars came out, the comet showed up prominently on camera. Once we knew where to look exactly, we could barely make out the comet with the naked eye, too.

The photo above is taken on a Canon T7i with kit lens, 20 seconds exposure, ISO 3200. I zoomed in all the way to get a close-up, too. This photo is taken with 30 seconds exposure. Movement of the earth is clearly visible with exposure that long, so the stars turn into streaks. However, the comet's tail is coming out more pronounced that way.

Saturday, July 18, 2020

SVL: Looking Around The Corner


When mounting a camera on a flat car for layout videos or remote operators, a common approach is to set the camera close to the front of the flat car, since we want to give the illusion of being in a locomotive cab. Seeing the front of the flat car destroys that illusion.

However, doing this has an unfortunate side-effect: Depending on the length of the flat car used viewers now complain that they can't see as much of the scenery along the track as they had hoped. Especially in tighter curves there is a distinct lack of scenery visible on the inside of the curve.

The camera doesn't "look around the corner".

Part of the reason for this is basic geometry: The car rides on a curve. The center of the camera view is on a tangent off the center of the curved track. Hence, the center line of the camera image and the center line of the track diverge. The tighter the curve, the larger the divergence, the more scenery on the outside of the curve is taking up screen real estate on the inner side of the camera view.

An additional factor is the length of the flat car. The longer the car, the more the ends of the car hang to the outside of the track center line, making the natural tangent effect worse.

The effect is demonstrated by the car in the middle above. The teal triangle simulates the view of a camera mounted at the very front of the car looking straight ahead. Barely anything to the right of the track is is visible to the camera, while plenty of scenery to the left of the track can be admired.

There are multiple ways to even this out:
  • Mount the camera in or near the front, but use a short flat car: By reducing the overhang at the end of the car, the camera's lens is positioned closer to the tangent off the track center line. Positioning the camera above the center of the front truck, or front axle, minimizes the overhang.
  • Using a long flat car, mount the camera in the middle of the car: Long cars have an overhang to the outside of the curve at the car ends, and an overhang to the inside of the curve in the middle of the car. We can use the middle overhang to move the center line of the camera to the inside of the curved track center line and pick up more visibility.
  • Using a long flat car, mount the camera in the rear of the car: Moving the camera further towards the rear of the car creates a "steering effect" where the front truck is "turning the car deck into the curve." In this setup the camera center line is not on a tangent off the curve, but on a chord. Hence the camera view captures much more of the scenery to the inside of the curve as demonstrated by the car on the right in the image above.
  • Using a wide-angle or fish-eye camera lens can help as well, but results in distortions along the edges of the image.
Using a single long flat car is convenient, since it has plenty of space for the camera and supporting gear like batteries.

If too much of the front half of the car is visible in the resulting video, in many cases cropping the video can hide the car deck. If that's not possible or insufficient, push the camera lens forward until the car deck is no longer visible. This will still produce a better video experience than mounting the camera at the very front of the car. Alternatively, use two flat cars. The front car holds the camera pushed as far to the rear as possible, and the second flat car holds the support gear.

Friday, July 17, 2020

Magnifying Glass with LED light


My eye sight used to be better. I guess I'm getting older ... Working with small detail parts or soldering in tight quarters is a bit of a gamble. The Brightech LightView PRO is a 5 inch magnifying glass with built in LED light. The arm mounts to the work bench. 

I tested it with soldering the parts for the SWD Fredi. It takes a little bit practice to get used to the magnifying glass, but then it's a real joy to work with. 

My first SWD Fredi


Tonight I built my first SWD Fredi. The instructions are easy to follow, but only accessible to FREMO members. I have two kits. One was built tonight. I guess I'll do the other one tomorrow.


The main board comes partially assembled. All the SMD parts are installed, and I just need to do the regular sized parts like connectors, LEDs, and buttons.


LEDs are soldered to the board. Moving on to the buttons.


Finally, I work on the direction switch and the speed knob. 


A locomotive gets assigned to the Fredi by dispatching it from another throttle connected to LocoNet. Hold Shift + Emergency Stop on the Fredi and the locomotive address is programmed. I tried this out with an UT4 on the Welztalbahn and it worked just fine.

The next time I'll attend a FREMO meet, I can contribute to the meet with a locomotive or two. Meanwhile, the SWD Fredi is a great throttle for the switching jobs on the Welztalbahn where changing of loco address is not required.

Update July 18, 2020:

The other Fredi is now also built.


Santa Teresa County Park: More Hiking

Rocky Ridge Trail

Today's hike leads from the Madrone day use area via Rocky Ridge Trail to Coyote Peak. The trail is quite rocky, but easy to navigate. It's a gentle climb from the parking lot to the peak with stunning views of the South Bay.

Almaden Valley with Quicksilver Park and Mt. Unumhum in the distance

Coyote Valley is not far

Railfanning the southbound Coast Starlight

Almost there

The descent from Coyote Peak to the parking lot via Hidden Springs Trail is much shorter and steeper than the way up, which worked out well for all of us. The round trip worked out to just over 4 miles.

Coyote Peak

Once again a nice morning hike in friendly company, and I was back home just in time for the first meeting of the day.

Monday, July 13, 2020

Experiments: Green Screen


I've been playing with OBS a lot lately. Today I tried something different: use a green screen to spiff up a virtual presentation. Instead of just screen-sharing the presentation, I'd use the laptop camera to film the room with me and a green screen in the background. Using the Chroma Key filter the green screen becomes transparent and shows the underlying window grab from Key Note in the OBS stack.

Here's my test arrangement.


Screen-grabbing video into Zoom or Meet tends to be somewhat problematic, and I didn't get the details right yet. However, getting the weatherman effect is cool and fun. I'm sure, I'll find more uses for this.

Sunday, July 12, 2020

Amtrak 11 at Blossom Hill


The timing was just right this morning to catch Amtrak 11, the southbound "Coast Starlight" at Blossom Hill Caltrain station. The train left San Jose 8 minutes late, but was going at a steady clip by the time it got here. Contrary to regular practice, today's 11 had the baggage car at the rear of the train.

It's always fun when the engineer acknowledges some random dude standing at the end of a platform with a camera, so I was delighted when he he greeted me with two short horn blasts and waved from the cab.

Saturday, July 11, 2020

Solar System Cleaners


I usually clean the solar panels in the summer months. It's July, so it's time. Pascal helped. In fact he did all the hard work, and I could take photos.


SVL: Club evening with remote operator


For tonight's club meeting I brought the camera to the layout, so that we could test more of the applicability of this on the actual layout. It worked well.

Here is James running the train on the layout from his home in the Santa Cruz Mountains.


The camera opens up new perspectives for ops. Here's a screenshot taken by another member participating in the video conference.


This time I set up in a much more comfortable location in the layout room.

Wednesday, July 08, 2020

I wanted a challenge ...


This is Bemo's kit 1004 820 for the württembergische Tssd. A beautiful metal model in 750mm narrow gauge (HOe) with many, many really small parts.


The locomotive can be built as Länderbahn, Reichsbahn, or Deutsche Bundesbahn prototype. I'm planning for the DB version, but maybe should practice metal building skills with the WEG VT 04 first, and definitely will need to get a  magnifying glass for the workbench.

Sunday, July 05, 2020

Untergroeningen: Locomotive Shed (8)


[ part 7 ]

While the ballast dries, I'm working on the floor of the locomotive shed. The idea here is that the floor will be permanently mounted to the module, while the locomotive shed will remain removable, at least for the time being.

The floor will get a concrete look with the rails embedded in the (styrene) concrete. The flangeways need to be quite wide to conform with NEM 340. The single Code 40 rail will provide power to the locomotive. I'm hoping it will be less obstrusive when the floor is painted.
[ part 9 ]

Untergroeningen: Trackwork (4)

[ part 3 ]

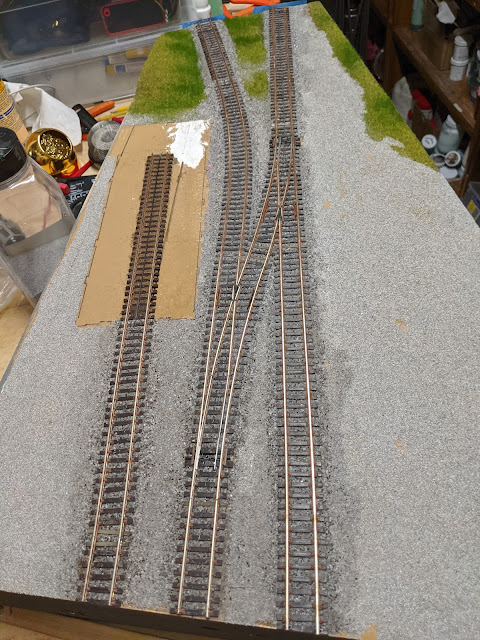
In the early 1970's Untergröningen station was more or less covered in ballast and small gravel, which is the look that I'm trying to replicate here. After laying the track, I was quite concerned that I'd have trouble representing the prototype.

However, after I started to sprinkle Arizona Rock & Minerals ballast #1332 around the tracks the concern turned into excitement. The tracks are slightly raised above the base with just a little bit of shoulder. The real rock provides some color variation which helps the overall scene.


This afternoon I finished ballasting the segment and applied Matte Medium to glue everything down. Unfortunately, the alcohol and Matte Medium washed some of the rock dust off the ties and rails. I might come back later with weathering powders to compensate.


For now I need to wait again and ... don't touch until the glue is dry!
[ part 5 ]

Saturday, July 04, 2020

Basic Scenery for Untergröningen (2)

[ part 1 ]

The trackwork for Untergröningen segment three is complete. Time for getting basic scenery done to match the first two segments. The prototype location has a lot of gravel around the tracks. I'm using Woodland Scenics Fine Grey Blend (B1393) for this base layer glued down with white glue.

While I'm working on the segment, I'm watching a cab view video of a freight train traveling from Untertürkheim to Nürnberg via the Murrbahn. It's nice to see the prototype locations. To my horror, I saw that the freight shed in Backnang has been torn down. What a pity, I had planned to take more photos and measurements during my next Germany trip.


Next comes dirt and grass. Fine dirt from the backyard, Scenery Express 2mm Late Summer fibers, with some Noch 6mm Wildgrass fibers for accents.


I don't know yet when I'll build the ramp for the tail track, nor how big it's going to be. I finished the scenery into the right hand corner so that it looks complete. This area will need to be adjusted when I build the ramp. I'll worry about that later.

Here's a view of the current state.