Showing posts with label modular. Show all posts

Sunday, January 03, 2021

Module 1: Transformation

Module One was the first complete module I built. It was meant as a test whether I can work with sufficient precision to put together modules. It confirmed I can and I went on to build Untergröningen and other modules. It turned out that using a Fremo E96 endplate on both ends of the module made construction simple, but the module not particularly versatile or interesting. I planned to complete and use the module as staging backdrop for train photos, but eventually lost interest in favor of building modules that supported operations on the Welztalbahn.


Module One had a somewhat awkward size, too, so I decided to convert Module One into two small modules to transition from E96 to F96. That should be easy: Make a cut across the middle, create two modules 8 inch and 12 inch in length respectively, and fit F96 endplates reusing the rest of the module structure.


That was easy. What I didn't consider was the amount of effort it takes to fit an endplate to an existing module under existing track and align it properly with 90 degree angles. I should have just ripped off the track and cut the edge on the table saw. ... But getting out the table saw is quite some effort, too, so it probably worked out to a wash.

After fiddling with hand saws, files, and angle rulers I had a not quite square, but workable cut.  

I used a strip cut from plywood on the table saw to align endplate and roadbed and glued it in place. Here's Module 1a.

I cut and fit pieces of pink foam to fill in the gaps, glued them in place, and shaved the scenery contours with a basket rasp.

Meanwhile, I started working on the 12" module, only to find that the existing endplate was not vertical. Instead of trying to fix that, I decided to strip the module, save the endplate and connectors, and toss the rest, so there won't be a Module 1b.

The wiring on Module 1a is as simple as it gets.

I coated the pink foam with tinted Scuptamold and painted it with my regular earth color.

Next stop: grass and bushes.


Adding dirt and glue.


So far, so good.

Wednesday, December 30, 2020

Slim Staging: Storage Cover

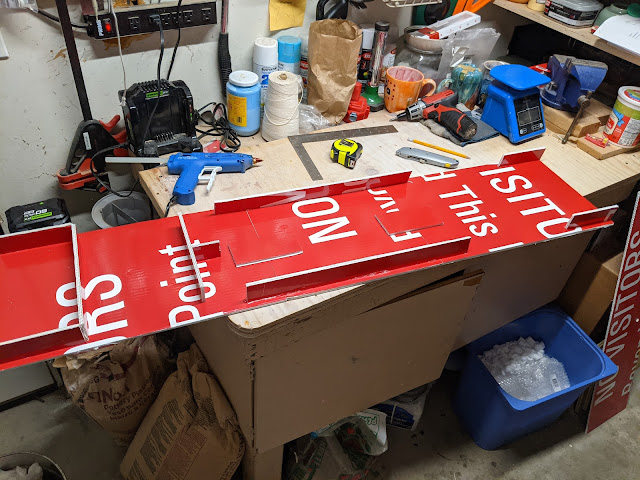
A couple years ago I found some double-corrugated signs in the trash at work. I figured this material should be useful for ... something more appropriate than boring signs. And it was.


One of the signs now came in handy to make a cover for Slim Staging. The module itself is 10" wide. The sides add a bit more, so I cut the cover pieces 11" wide to allow for some slop.


I needed three pieces to cover the length of the module, with one piece a bit shorter than the others. After test-fitting on the module, I used hot-glue to add guides on the underside of the cover.


A small cardboard box holds the power supply, the panel for the turnouts, and other small parts for the module. I added spacers to the cover so that the box can't move around when the module is transported.


All done. Time to put Slim Staging back into storage for now.

Friday, July 31, 2020

Untergroeningen: A Case for Segment One


This afternoon I turned a sheet of 1/8" hardboard into a case for Untergroeningen segment one. Now I can store it with the other modules in the storage rack in the garage, instead of having it take up space in the train room. 


You can never have too many clamps. I'd like to protect the underside better, but this will do.


All packed away.

Saturday, July 04, 2020

Basic Scenery for Untergröningen (2)

[ part 1 ]

The trackwork for Untergröningen segment three is complete. Time for getting basic scenery done to match the first two segments. The prototype location has a lot of gravel around the tracks. I'm using Woodland Scenics Fine Grey Blend (B1393) for this base layer glued down with white glue.

While I'm working on the segment, I'm watching a cab view video of a freight train traveling from Untertürkheim to Nürnberg via the Murrbahn. It's nice to see the prototype locations. To my horror, I saw that the freight shed in Backnang has been torn down. What a pity, I had planned to take more photos and measurements during my next Germany trip.


Next comes dirt and grass. Fine dirt from the backyard, Scenery Express 2mm Late Summer fibers, with some Noch 6mm Wildgrass fibers for accents.


I don't know yet when I'll build the ramp for the tail track, nor how big it's going to be. I finished the scenery into the right hand corner so that it looks complete. This area will need to be adjusted when I build the ramp. I'll worry about that later.

Here's a view of the current state.


Monday, June 01, 2020

Kurve: Extension Storage case


Here's a little finger exercise to get my mind off other things going on in this country. A small box connects the rest of the Kurve module to Slim Staging yard. While I built a storage case for Kurve a while ago, today the extension finally got its respective case. I'm using hardboard with glued and stapled strips of wood. I made the case high enough to leave room for some bushes and small trees on the hill as a transition to the trees on Kurve.


The main motivation for building the case is to protect the scenery from damage and dust while the module is stored in the garage. 

Saturday, April 25, 2020

Untergroeningen: More Testing


After the very successful remote ops session with SVL club members yesterday, I ran a couple more trains in Untergroeningen to exercise tracks and turnouts. I also set up the lighting system for a stress test and had everything on all day long.

Tatjana switched one session by herself and apparently had fun, too.


I used mostly the new Brawa BR212 in the Digital Extra version (#42863). This engine is a superb runner and the sounds are top-notch. The motor sounds just right, and the brake squeal is perfect. The locomotive comes with some fun features like motorized cooling fan that spins when the fan sounds come on, as well as remotely controlled couplers. The sound volume is too loud out of the box, but overall I'm very impressed with this engine.


I turned off the lights in the living room tonight, which dramatically enhances the shadow box effect of the layout. I can't wait to add trees and bushes in the background to get more texture.

The stress test did yield one victim: The 15 year old model trains power pack jury-rigged to run the lights. A slight pop, a whimper, and the lights were off. I have replaced the power pack with an adjustable DC:DC step-down module and connected the lights to the wall wart that is already powering the Tortoise turnout motors on the module. I had this on my todo list before, but now it's done, and I can check it off the list.

Friday, April 24, 2020

Untergroeningen: Virtual Ops Session

212 074 is ready for operations
Today is the last Friday of the month, when Silicon Valley Lines usually puts on the monthly operations session. However, due to COVID-19 shelter-in-place orders the club is closed. I suggested to the membership to try a virtual operation session instead, so we did.

I emailed a track diagram of Untergroeningen to the group before the meeting, as well as a switch list. The train is rather short, only 5 cars to set out and 4 cars to pick up. I ran the engine on the layout and the group told me which moves to make. There was quite a bit of discussion and banter along the way which made this an enjoyable experience.

Before the session, I set up the Untergroeningen modules in our living room and tested the arrangement.


To my utter surprise, the throws of most turnouts where misaligned and the Tortoises needed adjustment. That took some time. One puko strip did not have power. Apparently the solder point to the neigboring puko strip had come loose. Along with the new team track feeder, this was quickly repaired.


We did the virtual meeting with Google Meet. I joined the meeting from two laptops.

One laptop was set up on top of a nearby cabinet and showed a view from the right hand side of the arrangement. I simply used the built-in camera for this view.

The other laptop was connected to an external Webcam which was mounted high above the entrance to Untergroeningen station, looking in the opposite direction.
Having a camera at each end of the station seemed to work reasonably well, even with mediocre streaming quality, and the group could see what was happening on the arrangement.

Dave took a screenshot of what this looked like from his side.

Here's the staged train in the cut on module Kurve with the camera in the front. This is an old Microsoft VX-800 web cam, which has a fairly wide-angle lens, so it works nicely here.

Less than an hour after we started, 212 074 has spotted all inbound cars, picked up all outbound cars, and is ready to leave Untergroeningen for the return trip into staging.


The tracks are not ballasted yet. I'll do that when I finished working on Untergroeningen segment 3. I need better scenery transitions, bushes, trees, and many more details for this scene to really come to live, but this is going in the right direction to become what I have in mind.

Saturday, April 11, 2020

Module Storage


I have been building a few modules over the last year to support the extension of the Welztalbahn into the garage. Module storage takes up space, too, not a surprise. I kept most of them under the Welztalbahn in the layout room (except Kurve, which is just too big). However, this resulted in no work getting done on the Welztalbahn, since access to most areas under the layout has become very difficult, due to modules and other boxes taking up space.

It was time to do something about that. There is 19 inches of headroom between the top of the garage door mechanism and the ceiling. I built Kurve and Slim Staging, so that their total height doesn't exceed 14 inches in order to fit into this space.

I made a bracket from boards left over from other projects (like this or this) and a ripped 2x6 from the construction stash. I fitted the bracket to the ceiling and screwed it to the floor joists of the upstairs bedrooms with 5 inch construction lag bolts.


I ripped a 3/4in board to make slats for the modules to rest on. When loading the modules, I noticed that the slats sag a little bit. Seems manageable, but if it gets worse, I will build either a third bracket, or frame stronger support.

Here is a photo taken from the outside with the garage door open. Everything fits, and there's still some room left for additional storage.


Saturday, April 04, 2020

Basic Scenery for Untergröningen


Moving on to basic scenery in Untergröningen. I started with making asphalt for the road and the Raiffeisen lot.


 I cut templates from newspaper and transferred the shapes to styrene sheet.


I used textured spray paint on the styrene sheet to create slightly irregular surface, and spray painted in grey. Weathering the asphalt will come later.


Then it was time for the transformation. I love this step when brown paint is replaced by scenery texture. I made a time lapse video for the fun of it.


Here are some photos taken when I was done.


[ part 2 ]