Friday, April 29, 2011

San Diego Model Railroad Museum - a mixed experience

We went to visit the San Diego Model Railroad Museum today. It was a very mixed experience. Beforehand I took a look at their Web site, and learned that they have over 2700 sqm of floor space making it one of the biggest model railroad museums in the world. Now that's cool.

Once we got there two things irritated me right away:
  • Most of the layouts are behind glass, which makes photography incredibly difficult, if not impossible.
  • There's a lot of layout space still under construction.
Now, the latter item wasn't really that bad, but it made two other items stand out even more:
  • Very few trains were moving.
  • Most of the layouts are not really set up to be viewed from the visitor aisle.
As I was wandering down the visitor aisle between the first two layout rooms, I was beating myself that I didn't visit during one of the twice-weekly "work sessions" (Tuesday and Friday evenings). Doing that would have accomplished two things:
  • Getting to see (some of) the layouts without having to peek through glass
  • Have a chat with the people actually building this thing
I realized that this museum is really a collection of a few large club layouts in one space.

The O-Scale "Cabrillo Southwestern" didn't really excite me that much. The layout lighting was terrible, and it was hard to see details in the back of the rectangular layout room, since the visitor aisle runs only along one of the long edges of the rectangle. Looking at construction methods and track layout it appears this layout has been around for quite a while (though the Website claims it was designed in 1986 ... Well that's still 25 years :-) The layout did remind me about how big O-Scale really is. Thus, the hefty rolling stock had some serious "oompf" to it.
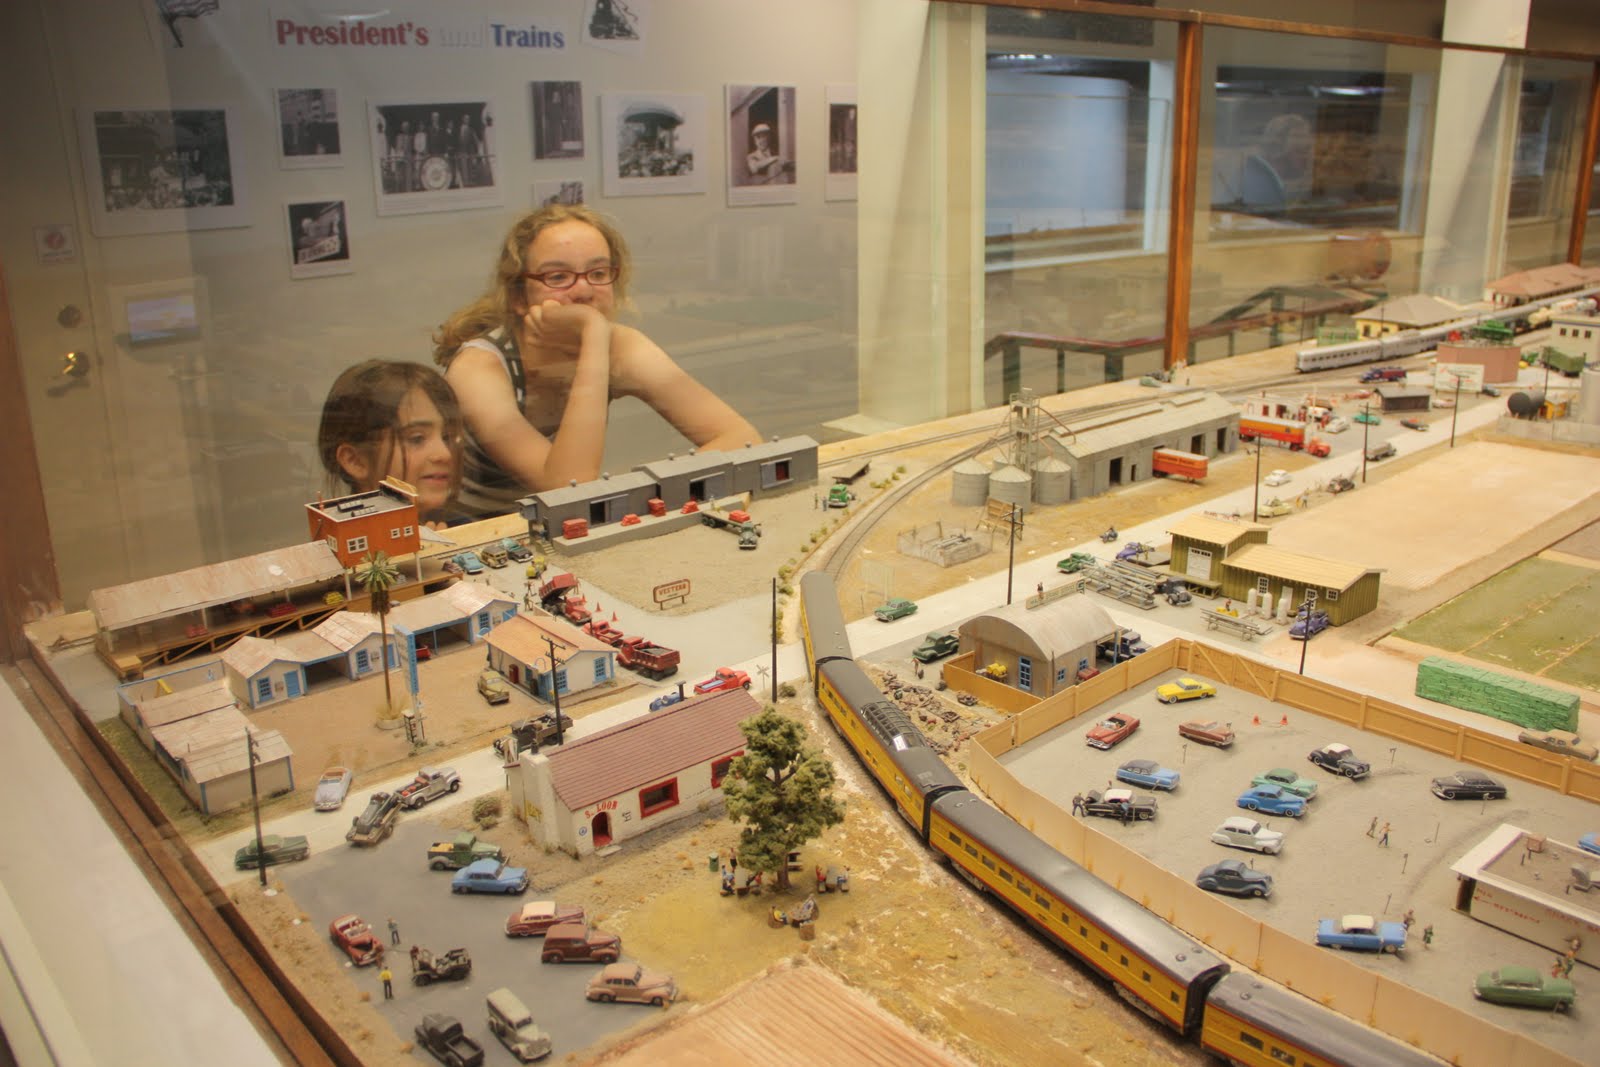
A large part of the HO-Scale "San Diego & Arizona Eastern", especially near the museum entrance, is still visibly under construction. This layout attempts a quite correct depiction of actual rail lines around San Diego to the East and South into Mexico. This is one of the biggest layouts in the museum space-wise, and was quite interesting to view. The area depicting San Diego looks very interesting to operate on. The "desert side" with El Cajon has some impressive deep canyons and trestles , though the scenery is very sparse. This layout "burns" a lot of space on the mountains, canyons, and the descent into El Cajon. It does look more or less accurate and true to the prototype. Unfortunately for the museum visitor, the prototype is a lot of single-track main line. The layout is manually controlled, and doesn't appear to have any automation, so while we were visiting two friendly guys were running trains over the mountains. ... For some reason pretty much all major trains on the layout were at or en-route to El Cajon. So there was a major traffic jam getting trains out from El Cajon and back on the San Diego side of the layout. Somewhat interesting for the operators. Terrible for the visitor. This layout has a lot of potential, though...

The N-Scale "Pacific Desert Lines" was cute to look at. The visitor aisle side of the layout is painted like a passenger railcar and the viewing windows are the windows of the car. Neat. The layout is large and very deep (6+ meters). Given it's N-scale, it's hard to see anything interesting that's more than 2-3 meters away from the visitor aisle. I saw a single train moving on this layout. Disappointing.

The kids had a blast in the "Toy Train gallery" which is a relatively small room with 3 gentlemen running Lionel trains on 3-rail track. The layout is stuffed with tracks all over and there's a lot going on, so a very welcome diversion from the mostly static displays we saw with the other layouts.

Hands-down the most impressive layout at the museum is the "Tehachapi Pass" HO layout. The scenery in combination with the painted backdrop is superb, and the layout is actually arranged to be viewer friendly. There are no windows to peek through, no back at the wall features like on most of the other layouts. Just the SP/BNSF Tehachapi mainline climbing through the mountains up to the pass. Operationally, again this is not particularly interesting to watch, and not many trains where running, but the presentation and level of detail make up for it. I particularly liked the scene at Bealville, which has a very nice, old-timey atmosphere. Even though this layout is controlled digitally, trains are run over the line by an operator, one at a time, so there wasn't a lot going on here either.

Was it worth going? I don't know. Definitely more interesting than some other attractions at Balboa park, but my expectations were certainly higher than the delivery. I came for the layouts, so I didn't pay much attention to the wall display cases, with exception of the one that had items from John Allen's Gorre & Daphetid layout, including paper machee models of the layout.

Due to the impossible photography conditions, I didn't take many pictures. However, I got some video footage and will upload to Youtube if it's usable.

Sunday, April 10, 2011

Progress?

Yep, there's been very little progress on the layout lately. Work kept me busy, and the weekends are chock-full with non-modelling activities.

I did manage to build a new panel for Emsingen that should be more straight-forward to use than the old one. Now, if only I could convince the SRC16 decoder to actually talk to LocoNet, so that the push-button actions actually show up as switch commands to the command station... Team Digital's support is very responsive, but we haven't gotten to the bottom of this yet.

Out of frustration dealing with electronics the last few evenings I worked on the layout, tonight I added a platform edge to Emsingen's track 2, as well as built the styrofoam core for tracks 1,  and 1a. Styrofoam is a messy material to use for this, but it's what I had on hand for track 2, so I used it for track 1 as well.

The access hatch under the Emsingen station building is starting to become tight. This was always meant for emergencies only, but turned out to be convenient when I have visitors so I can get out of the way, as well as for working on the engine servicing facility.
I'm pretty sure I'll build the town of Emsingen off-layout, once I have a basic support frame in place, since that corner is harder to reach than I expected.

Saturday, April 02, 2011

This is tiresome and makes me annoying

Taxes for 2010 are done, and e-filed. Just like last year the return keeps getting more complicated. One stumbling block took me a while a figure out, but in the end was really easy ...
Once you make your way through the various broker statements and 1099 forms, and reconcile what they talk about with what TurboTax offers.

Overall, I was quite a bit more annoyed about filing taxes this year than last year.

Thursday, March 24, 2011

Thirty Inches of Snow

The buzz in the Boston office for the last couple days was that there will be snow. It's certainly cold enough, but every morning I woke up, there was no snow.

Until today:


A whopping thirty linear inches of snow, right next to the side walk.

Update (03/24/2011):
Tonight there was a very light snow shower. It was nice walking back to the hotel with some white fluffy stuff twirling around, though it was over after a few minutes, and no snow on the ground. Everyone here is longing for spring and was amused by my excitement about a few flakes of snow.

Monday, March 21, 2011

Rain and sun at the airport

My flight is delayed. There's some heavy rain around SFO. Though, it looks nice through the airport windows.


Boston will be a lot colder than San Francisco...


Update:
Boston _is_ colder.


Update:
Za Restaurant has an execellent Mac'N'Cheese pizza, that I improved further with bacon per recommendation from the waitress. Very good. Very rich. Nice crust.

Sunday, March 20, 2011

Second Operating Session on the Welztalbahn

Well, this was a disaster.

I wasn't prepared. Emsingen wasn't ready. JMRI Logix played tricks on me. And there were power problems.

When I installed the yard in Emsingen, I apparently forgot to connect one of the tracks to power. That was easily fixed, once noticed (thanks, Balasz), but it was a bit annoying nethertheless. What was worse, though, was that my spiffy new JMRI panel for Emsingen is over-engineered, has bugs in the routing logix, and only works on the control computer. The over-engineering makes the panel harder to use than necessary. The logix bug causes an endless series of switch commands to be sent to one switch, renders JMRI unresponsive, and apparently managed to burn out the affected output on one of my DS64 stationary decoders.
Finally, the whole reason I created that panel was so that I can drive it via the Web interface from an Android G1 smart phone.  The catch? Sensor button pushes, which were meant as the primary means to drive the panel are not recognized via the Web interface.

We spent quite a bit of time debugging car routing in the Operations part of JMRI. Waaaay too much time for routing 30 cars around. "How did that car get here, and why is it not moving?", was a fairly common sigh.

There were also issues with power pickup in some underground sections, especially in the curves leading to and from the ramp. Staging needs some thorough clean-up and track polishing. At least once the PSX circuit breakers were too sensitive and cut power for what should have been a momentary blip.

I have a lot of work to do...

Thursday, March 17, 2011

Success!

It took me only 3 evenings in elapsed time, but the dryer belt is replaced thanks to Appliance Parts on Blossom Hill, judicious study of Internet how-to articles (which appear to be more or less just copies of each other), and good old observation.

Our dryer flat out stopped spinning the drum. After a few Google searches it was likely that the dryer belt was bad, and that was confirmed when I found the old belt under the dryer. I didn't realize at first, but dryers are really just boxes of sheet metal held together with little plastic clips and a few screws. When you know where to pull a dryer quickly comes apart. The mechanics are super simple, too: A motor, a pulley, a belt around the drum. Once you figure out in what sequence to install the parts, and where to thread the belt (belt around drum, put pulley in place, loop belt through pulley, then around motor axle), with help holding the drum in place, this was really just a 15 minute job start to finish.

I guess most of the $100 I saved by doing this myself pay for the knowledge of doing this efficiently.

Laughing Baby


What the hell is so funny about this video? I don't really know. I don't know the poster, nor the baby.
At the surface it's like any of the other million laughing baby videos on Youtube.

Yet, I still can't stop laughing any time I watch this video. The faces this baby makes, ... His reaction to the blowing-nose noises, ... It just cracks me up.

Sunday, March 13, 2011

That didn't work

I had this idea to use a spare Android G1 as a portable panel for Emsingen (at least until I'd built a physical panel near the station). I made a panel for Emsingen in JMRI and decked it all out with logix and routes. On the screen I could emulate the prototype practice of pressing a source and a target button and switches would be lined for the route between the two buttons.

Well, it didn't work out that way, mainly because the panel as presented by JMRI's mini-Webserver doesn't harmonize with Android's Web browser, so any clicks on Android result in a refresh of the panel image, but no actual button press being recorded on my JMRI IS buttons.

Next I experimented with the sand cover of the platform in Emsingen. Neither deco-sand, nor regular sand I had available worked out. The deco sand is way too shiny, and glittery. The platform looked like a Danish butter cookie. Regular sand is not sufficiently homogeneous and fine. I think I need some very fine powdery sand for this to come out right. Maybe Arizona Rock and Minerals Co. has a color and grain size that works in their product catalog ...

Finally a useful explanation of what's happening at Fukushima

This blog entry explains very clearly and precisely how reactors like Fukushima-1 function and what can and can not happen during events that lead to possible meltdowns. I very much like the comparison in the comments of nuclear meltdowns to heart-attacks. They are all bad, but not every heart attack will kill you.

Friday, March 04, 2011

"Gar kein Problem"

My flight back to the US is this coming Monday. I have a Lufthansa ticket, and will arrive by train at Frankfurt airport at 12:38 (Lufthansa 353). My connecting flight is Lufthansa 9052 (i.e. United 901), leaving at 14:00. The departure time is really convenient since I don't need to hurry Monday morning, or get up at some awful early-morning hour.

I just called Lufthansa reservations to confirm whether 72 minutes is enough time to get off the train, check luggage, pass through security, and get to the departure gate.  "Ja das geht, ist gar kein Problem", said the nice lady at the other end.

ok, then, if this is no problem, I won't worry about it.

Thursday, February 24, 2011

No tape, no ground cover

The platform for track 2 is in and debris cleaned up. It looks pretty bad right now, but I hope it will be much better once I add the platform edge (made from a Heki cut stone sheet), and build up the sanded top of the platform. I still need to build the platform for the house track. That platform will run roughly from the end of the switch on the left to where the cardboard sign for Emsingen is located. Due to that switch, obviously long passenger trains need to stop at track 2.


Adding ballast to the track as well as ground cover (dirt, sand, and gras) on the areas between tracks will substantially help with how this area will look.

However, my first experiments with ballasting and ground cover in Talheim were actually not that satisfying, both in color, texture and general appearance.  The photo below gives an idea of the look I'm after for the tracks.


I think the best way forward will be to build a small diorama with a short section of track, maybe two track lengths long (i.e. 36cm), and scenic that from beginning to end. One half of the diorama will be station track (ballasted with an assumed drainage pipe, like in the photo above), the other half will be the regular high ballast with water draining to the sides of the track.

Live flight tracking for SFO

This is cool. Live flight tracking around SF Bay Area.

Gorre & Daphetid in Z Scale

Just in case you have not seen this yet...

David K. Smith is chronicling his endeavor to build John Allen's Gorre & Daphetid in Z Scale for a couple months now. Following this blog's almost daily updates is  truly fascinating reading on the wonders and pains of model railroad modeling.

Update 9/28/2014:
David has removed all his personal blogs due to trolls and other idiots that can't appreciate people showing off their work. What a pity.
The G&D in Z scale went into the trash some time last year after all turnouts stopped working, and the layout was damaged. I removed the link to the G&D blog. 

American Politics is just frustrating

The California High Speed Rail blog has an interesting article commenting on a Michael Byrne article basically arguing that major infrastructure improvements -- actually any major public works project -- that can't be completed while one federal administration is in power, is doomed to failure. That is due to partisan politicking and fundamentally different opinions on how tax payer money should be spent, as policies and priorities can change substantially from one administration to the next.

Both articles look at this through the eyes of infrastructure advocates. However, the same pattern is pervasive throughout all levels of government, federal, state, and even local.
In the end I strongly feel that the existing two-party and winner-take-all system is to blame for this, because it leads to a mentality of not wanting, nor needing to compromise. Even the media (TV, newspapers, Web sites) can be fairly easily classified into "right-wing" and "left-wing", catering to their respective constituencies for entertainment, and ad-dollars.

Balanced opinions and thoughtful commentary are hard to find in this climate of pervasive hyperbole. This just makes me sad.

On the positive side I do like the no-nonsense approach Governor Jerry Brown is taking in California. Granted, he has nothing to prove on the political front anymore, which is why he can comfortably play this role, and even propose raising taxes without committing political suicide. I'm very curious how this will play out over the next few months.

Sunday, February 20, 2011

Read the instructions!

A couple weeks ago I complained that I can't get the Uhlenbrock 63350 to send sensor messages to LocoNet. After reviewing the drawings in the instructions yet another time, I noticed that I was just missing a Ground connection between the Ground pin of the 63350, and DCC Ground. I expected that the 63350 would use LocoNet Ground (or RailSync), but apparently it doesn't. I also misread part of the instruction text talking about Ground between boosters in the instructions.
Now I'm somewhat baffled that at power-up the unit would actualy report anything given the setup I had.

A platform in Emsingen

I didn't feel like running trains tonight. Nor was I in the mood to build the control panel for Emsingen (the electronics don't like me this week. Why the heck can I not get the sensors of the Uhlenbrock 63350 to report that there is something to report when I connect Ground to an input? gah! But I disgress...)

So I started mucking around with a piece of styrofoam to build the platform for Emsingen's track 2. Working with styrofoam is messy. A very sharp knife is helpful. That turned out better than I expected, and after a few more experiments  I glued down the styrofoam. The idea was to build the platform core from styrofoam and then cover it with the usual plaster-vermiculite mix.


I imagine the platform is built from gravel and dirt with a sanded top. The side towards track 2 is raised slightly above the the rails, while the side facing track 1 is sloping down. There will be two crossings over track 1 for passengers to get to the platform for track 2. One can see the styrofoam core on the photo below.


Since I had the tracks masked off already, I also filled in the area between track 2 and track 3, as well as a small section between track 3 and track 4. While I tried to make the surface of the platform really smooth, the fills are a bit more rough. Of course, the debris will be cleaned up once the plaster is dry. I should have just used a cork sheet when building the station area, instead of individual cork strips for the tracks. Oh well ...

Monday, February 14, 2011

Emsingen Underground

True, I didn't put up photos with my last two trains posts. I figured nobody is reading this stuff anyways. I was wrong. So, by popular demand this post goes into a few more details, and has photos of the ugly underbelly.

Emsingen Underground
South Switches from below
For orientation around Emsingen, take a look at the photos in this post from last year. The small yard in the upper photo is at the south end of Emsingen, while the north side sports a loading ramp, and a tail track.

Most people don't show the underside of their layouts because unless you have a large layout, or are really anal about cabling, it's usually a mess. Exceptions confirm the norm. Modular, or portable layouts tend to have cleaner cabling than stationary layouts. Anyways, the photo on the right gives a pretty good idea what my cabling looks like... Hey, at least I color code everything. Black/red is the main DCC bus (usually AWG14 cable). I have three independent power districts, this is in the "blue" district as signified by the blue tape wrapped around the bus cable.
Those red plastic thingies are 3M insulation displacement connectors (IDCs) to connect rail feeders to the main bus. The round grey cables are various local cable runs (e.g. the one at the top is connected to train detection sections, the one at the bottom runs to a servo in a somewhat remote corner of the layout). Blue/yellow is the 16V AC bus, and blue/red is the DCC accessory bus.
The printed circuit board in the back is a Tam Valley Depot QuadP servo controller.

The photo below shows my technique for installing and  connecting Tortoise switch machines. First off, at the workbench, I solder a short cable to the contacts and run it to a terminal block. The Tortoise has two built-in contacts for powering frogs or switch feedback. I don't really have a need for either of them, but since I have a 5 wire cable, I connected one of them.
Emsingen Underground Yard Switches
The Tortoise is screwed to a block of 3/4" plywood. After I prepared the hole for the throw bar at the switch, I add some wood glue to the top of the block, thread the actuator throw the hole in the switch throwbar, position the Tortoise, and test the throw, repositioning the motor until I found a position that evenly throws the switch without going too far in either direction. Then I hold the motor in that position until the glue starts to set and becomes tacky.
Depending on the amount of glue I added, this takes anywhere from 5-10 minutes, which is usually enough working time to find a good working position for the motor, and not so long that my arm falls off before the glue has become tacky enough to hold the motor in place.

Using terminal blocks between the track and the main bus, or between switches and decoders, makes it easy to disconnect wires for debugging.

Tortoise vs. UP5
Sometimes things don't quite work out, because you don't think about what happens behind the scenes. A few weeks ago I installed a Digitrax UP5 panel in the fascia at Emsingen. This is used to plug in Loconet throttles. The panel is connected to a printed circuit board that extends a couple inches behind the fascia. No problem. ... Until I tried to install the Tortoise for one of the yard switches, which happens to collide with one of the Loconet plugs at the back of the UP5. Had I installed the UP5 half an inch to the left, or a couple inches to the right, this would not have been a problem at all. Now it just barely fits when I let the UP5 stick out from the fascia a fraction of an inch.

Emsingen North Switches from below
The photo on the left gives an idea about how cramped the area underneath Emsingen is (and how big those Tortoise motors are...) Not only is there plenty of cabling in the way, but also a track running through the middle of it. Those white "guard rails" are extra slats from window blinds.

Emsingen South Switches


To wrap up, here are the south switches in Emsingen from the top. The big rectangular holes will hold the twin-coil semaphor machines ... Unless I'm crazy enough to either buy new semaphors with servo drives, or outfit the semaphores I have with servos...

Sunday, February 13, 2011

All switches installed and motorized in Emsingen

Over the last couple days I installed switch machines and programmed decoders for all switches in Emsingen. I used mostly Tortoise motors I bought quite a while ago, as well as a servo in one somewhat tight spot. The switch leading to the Lokstation is not yet motorized, but it also doesn't actually go anywhere.
The next project is completing the JMRI panel and routes for Emsingen, so that I can actually use all those switches without having to remember individual switch addresses.

While messing with cables I shorted out part of one of my Tam Valley Depot Servo Decoders. Very, very annoying, since I now can no longer fine tune the individual servo positions. I also managed to make a Team Digital SRC16 decoder completely non-responsive to switch commands. Only a hard-reset (hold the Smart button for ~30 seconds) brought it back to life. I love the very slow switch throw of this unit in combination with the Tortoise switch machines.

Wednesday, February 09, 2011

Breakfast View