

Thursday, August 30, 2012
Food in Terminal A at SFO
Firewood Cafe near gate A10. Good pizza, but don't order if you are in a hurry.


Monday, August 27, 2012
Operations in Emsingen
Above time-lapse video shows operations in Emsingen during a recent freight-only session.
The morning local freight (Ng 83746) arrives from Prechtal, drops cars, and the locomotive is sent to servicing.
The late morning local freight (Ng 83720) from Hausach to Freiburg, and early afternoon local freight (Ng 83721) both switch cars in Emsingen, too.
Actual elapsed time was 30 minutes.
On a technical note:
I filmed this with a Samsung Galaxy Nexus in HD and post-processed in KDEnlive. Original file was 2GB in size (yes, the phone stops recording once it reaches 2GB), upload size to Youtube is 420MB.
Saturday, August 25, 2012
Wilderness & Survival Skills Class @ AdventureOut
AdventureOut is offering survival classes in the Santa Cruz Mountains. Pascal and I got to enjoy the class today. Mark and Jack are great instructors and both of us had a lot of fun.
 |
| Pascal tests our (incomplete) debris hut. |
 |
| Making fire. This is really hard work for a nine year-old. |
First time I actually made fire with a bow drill.
 |
| Yay, I have a tiny coal. Let it smolder ... |
 |
| ... and pack into a nest of yute twine. |
 |
| Smoke ... |
 |
| ... and fire. Ouch! This is hot! |
 |
| ... and quickly throw it into the fire ring. |
Background

I should really be doing something else, but it felt good to paint more of the backdrop tonight. Compare to what this looked like before. Most of the distant "hills" above the tree line on the left-hand wall will be painted over with sky.
Monday, August 20, 2012
Hinteraecker
Here's my materials list for basic ground cover at Hinteraecker.

First I added a coat of fine green flock directly on the still wet "brown dirt" paint.

The next step is messy, so we enter "cover up everything land". Some 70% alcohol as a wetting agent, followed by a generous application of scenic glue (aka matte medium), topped with static grass. I tried to create a lush, unkept appearance for the grass on the hill making room for a more dried up look between the tracks.
If you look closely, you'll notice that I also installed the south entry signal for Emsingen, completing signal installation on the layout.

Sunday, August 19, 2012
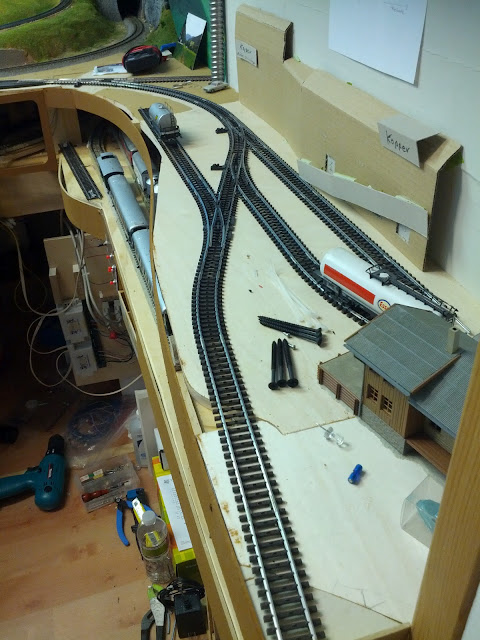
Kopper sidings
I was not happy with the track arrangement around the Kopper furniture factory. Particularly the track to Gregorius Wood looked awful. You can see a good shot of the area in an earlier post.
I had several issues to deal with:
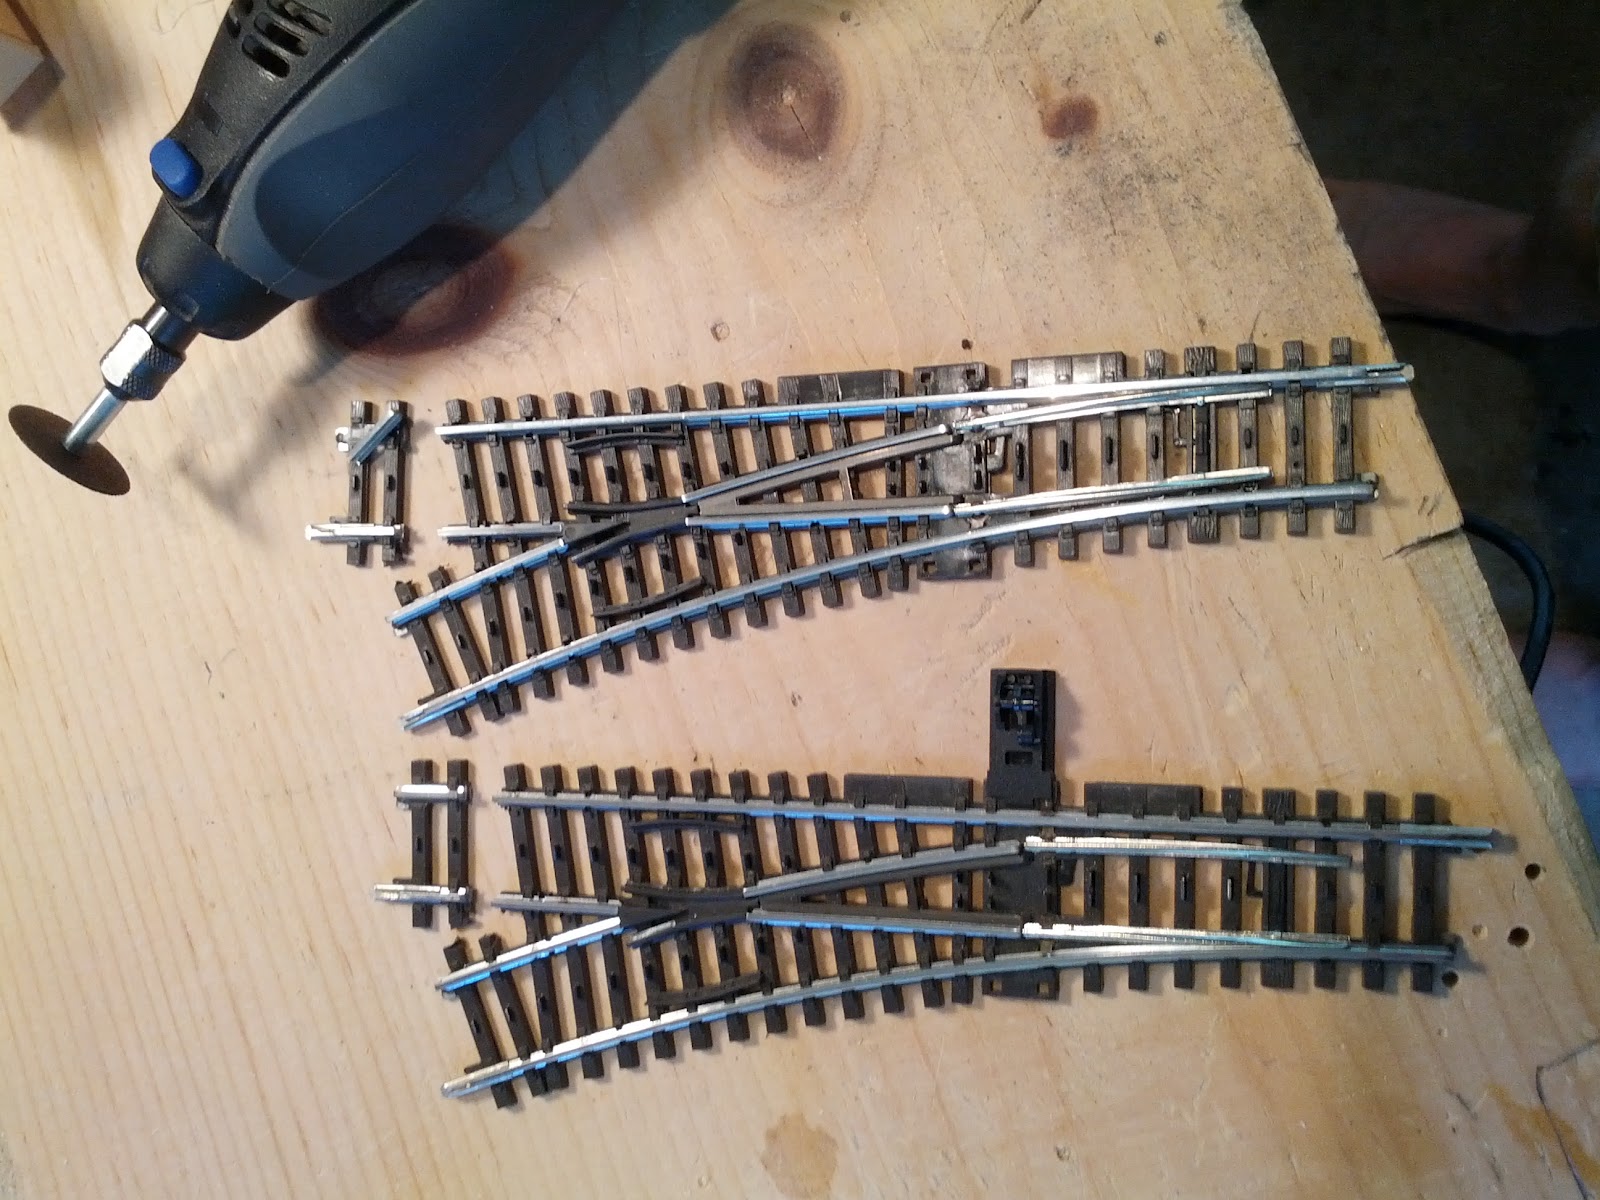 |
| Dremeled turnouts |
I had several issues to deal with:
- Since this is a trailing point siding, I need substantial amount of track to pull cars. Ideally enough track to pull all cars from the siding with one movement.
- The curve right after the turnout is sub-optimal.
- I can't go straight out of the turnout, since I'd run off the baseboard, or get really close to the edge.
 |
| The cut turnouts put together |
The solution involved shortening the stock Maerklin turnouts using a Dremel with a cut-off disk.
This had two nice effects.
- It moved the divering legs of the turnouts closer together, and I gained just enough space to now run the Gregorius siding straight out of the turnout.
- By reducing the length of the turnouts, I gained just enough space between the switch and the end of track to fit the length of the siding, plus a Koef switching locomotive.
The overview shot below nicely shows the positive effect this small change had on the track layout in the area. You can also see the smal triangular piece of plywood I added at the very end of the pull-out track to gain a whee bit more track length all the way to the edge of the layout entryway.

The only catch is that I had to cut some of the electrical connections in the turnouts for this to work, and the joint is very fragile. I'll need to wire the siding and pullout track separately, but that was planned anyways, so nothing lost here. The pullout track will double as team track during operating sessions.
Saturday, August 18, 2012
Fascia done
The fascia is completely installed and painted.


I really like the effect of the fascia in the last photo. Access to staging is a little bit more limited now, and I will have ... fun ... installing the turnout motors when the time comes, though it's all manageable and worth it.
Fascia for Talheim

Doesn't this look really unfinished? ... Yeah, I thought so, too. Last week I installed the last mainline turnout motor in Talheim, so I can finally think about making this look a bit nicer.

I went a little bit over the top with this section of the fascia. Just had a whee bit too much fun designing the shapes.
Though, I think the result is worth the effort, and it frames the railroad a bit more. I need large openings for access to hidden staging which disturb the frame effect quite a bit. There's always a compromise in this somewhere.

Roundhouse
I didn't like the red plastic walls inside the roundhouse. Neither did Pascal. So I went in and painted the inside in PollyScale "aged white", which really means "very light yellow". Since I used a brush (and should have done this at the very beginning of this project with an airbrush), and the "white" doesn't really cover the plastic that well (and I should probably have primed it before putting the walls together), the question of texture on the walls resolved itself. It'll be brush marks, and I'll do better next time.

Above photo also shows the beginning of interior lighting for the roundhouse. These are Micromark 12V grain of rice miniature lamps mounted in sockets that came with the roundhouse kit. I keep thinking about whether I should add inspection pits. I'd really like that, but going through the trouble with the center pickup is just not worth it. Since this is inside the roundhouse, what I will do instead is to cover the ties with very thin styrene painted in the color of the roundhouse floor. The inspection pits will be represented by an area without this styrene "floor" and I'll paint the ground and ties black. That should get enough of the "there's a hole in the ground" effect I'm looking for, and when the roof is on you can see this only through doors and windows anyways.
Speaking of roof ...
 |
| The roof is still missing the smoke vents above the engine stalls |
 |
| Ef tower with roundhouse in the background |
 |
| Roundhouse, Ef tower, and the future Emsingen station building |
Tuesday, August 14, 2012
Turntable pit
While the ground behind the tracks dries, the turntable pit support gets its final positioning.

The base board is 1/2" birch plywood. My Roco turntable needs a slight bit of space all around for the indexing to work properly and at the same time requires all the support it can get. The piece of 1/8" hard board has been positioned and marked before I moved the whole arrangement to the work bench, with all the track and buildings marked as well. After the hardboard is solidly in place, I'll build a support bracket for the turntable to rest on, so that there is no way it can sag and bind under even the heaviest locomotives.

The base board is 1/2" birch plywood. My Roco turntable needs a slight bit of space all around for the indexing to work properly and at the same time requires all the support it can get. The piece of 1/8" hard board has been positioned and marked before I moved the whole arrangement to the work bench, with all the track and buildings marked as well. After the hardboard is solidly in place, I'll build a support bracket for the turntable to rest on, so that there is no way it can sag and bind under even the heaviest locomotives.
Sunday, August 12, 2012
Emsingen Hinteraecker

Emsingen Hinteraecker isn't really modelled on the layout. Hinteraecker is the area behind the maintenance facility and represented mostly by some fruit trees, some grass, a few decidious trees and bushes along the tracks. I will try to paint a small field on the backdrop. We'll see how that works out.
The ground is my usual mix of 5 parts vermiculite, 4 parts plaster of paris, and 3 parts water, plus Tempera powder paint (adapted from Joe Fugate's video series). Instead of brown, which turns into a redish tone when mixed with the plaster, this time I tried black. Two spoons of black tempera is one spoon too many.
I will completely redo this section of the backdrop.
Saturday, August 11, 2012
Kitchen Faucet
A couple months ago multiple people managed to unscrew the whole faucet from the sink, merely by moving the faucet arm back and forth. At first I thought, "what the ...?" , but after a while it became apparent that there's something wrong with the faucet itself.
Today, I took the whole thing apart.

 I knew from some initial observation two weeks ago that a rubber gasket inside the faucet was stuck between the grey plastic piece and the outside wall of the faucet. Turns out, there are two of those suckers... and they were ripped to pieces.
There was also quite a bit of gunk built up around the brass pieces. I'm guess from water that got inside the handle and evaporated there leaving behind calcium deposits (Thanks to our hard ground water...)
I cleaned that out all out and replaced the gaskets with new ones from a somewhat generic Delta repair kit. Hopefully, I picked the right ones, at least it all went back together nicely ... with some swearing, until I realized I need to use the skinny gaskets from the kit.
I don't claim I have any idea what I'm doing here. While at it I also cleaned out the pipes and trap underneath the sink.
Let's see how long this will last.

Today, I took the whole thing apart.


There was also quite a bit of gunk built up around the brass pieces. I'm guess from water that got inside the handle and evaporated there leaving behind calcium deposits (Thanks to our hard ground water...)
I cleaned that out all out and replaced the gaskets with new ones from a somewhat generic Delta repair kit. Hopefully, I picked the right ones, at least it all went back together nicely ... with some swearing, until I realized I need to use the skinny gaskets from the kit.
I don't claim I have any idea what I'm doing here. While at it I also cleaned out the pipes and trap underneath the sink.
Let's see how long this will last.

Friday, July 27, 2012
Roundhouse shell
 |
| The roundhouse shell is complete. |
 |
| Some work benches and tool cabinets are in place |
There needs to be an easy way to simulate a somewhat dirty off-white brick wall for the inside of the roundhouse. This would have been easier with the walls off, but I figured it won't bug me that much. MEEEEK! ... Wrong.
At a minimum, I will just paint the inside red walls with some off-white color and "dirty them up" during installation of the roundhouse tracks. No brick texture, but better than these red plastic panels.
What are options to get some texture on these walls? It needs to be easy to cut and install, and should take paint well (if not in the right color already). Some kind of wall paper, maybe?
Thursday, July 26, 2012
Wednesday, July 25, 2012
Roundhouse progress
 |
| The roundhouse is starting to come together |
 |
| With the window frames in, the mortar doesn't look quite as bad anymore |
 |
| The inside is getting some furniture, including an oven. |
Sunday, July 22, 2012
Emsingen Ef
 |
| Testing placement of Emsingen Ef |
The levers ("Hebelbank") are in the bridge part of the tower, so this couldn't be a purely mechanical tower. There's not enough space underneath the floor to run the actuator wires. However, it's feasible as an electro-mechanical tower, where the levers electrically actuate signal and switch machines in the basement on the right, which then move signals and throw turnouts.
I'll place a small tower ("Emsingen En") on the north side of the station to guard the railroad crossing and operate nearby turnouts and northbound signals. Admittedly, two towers is somewhat overkill for a station the size of Emsingen, but there does need to be at least an attendant shed at the crossing to ensure vehicle traffic is safely off the tracks.
To properly set Emsingen Ef in place, I need to level the ground and cover up the semaphore machines, as well as add some lights at least to the bridge part of the building. I hope illumination will show off the Hebelbank, especially at night.
Aside from the tower, I also bought background buildings for Emsingen, and some additional detailing for Emsingen station.
Wednesday, July 11, 2012
Patina

A new project. I might have overdone the mortar a bit, but will tone it down a bit in the final stages of assembly. Really looking forward to building this model.
Tuesday, July 10, 2012
That pesky curved turnout
I mentioned before that the curved turnout on the ramp from staging didn't want to play ball with BR24. Today I ran that locomotive over the spot where it got stuck consistently two weeks ...uh, a month ago, and sure enough, just like last year, no problems anymore.
However, since BR24 has the pickup shoe below the locomotive, and the loco frame is quite a bit more open than the tender of BR50, I could actually observe what the pickup show is doing as it glides across the turnout. At one point, right above the pivot of the turnout points, the pickup shoe drops and then gets lifted up again.
Even closer observation showed, that there is potential for the pickup shoe to slip off the raised point contact in the area, and then get caught in the next middle contact.

To work around this problem, I super-glued a small piece of styrene into the turnout that should keep the pickup shoe out of the "hole" and in line with the top of the point contacts. The ramp from staging comes from the right.
Yes, all of staging is built with Maerklin M-track.
Subscribe to:
Comments (Atom)