Monday, January 11, 2021

A keep-alive for Maerklin 37180 (094 232-6)


Maerklin's 37180 model of BR94 in early era IV livery is a beautiful model. In addition, it's lettered for BD Stuttgart, Bw Crailsheim which makes it perfect for use on the projected Murrbahn layout.
Even though I don't have any photographic evidence that a BR94 was operated between Backnang and Gaildorf/West in the early 1970's, the opportunity to pick up a model that could have been running at least nearby was too good to pass up.

Meanwhile, it's a great switching engine for sessions on the Welztalbahn. There's only one catch: The power pickup seems to be a bit finicky and there is minimal run-out distance on my model, despite the motor having an -- admittedly small -- flywheel.  Other modelers reported not having any problems, so maybe I'm particularly picky, or the pickup shoe needs some love. In any case, I want to use this engine in situations that require slow switching moves and nothing is more annoying than the locomotive getting stuck on a yard ladder turnout. Hence, I looked into what it would take to install a keep-alive, in addition to a mechanical review of the pickup shoe. 


This is a tender locomotive, which are not exactly blessed with space, so I searched for really small keep-alive units. Tams usv-mini have a nifty way to hardwire with any decoder, so that the keep-alive is turned off during programming, which I would have preferred for this application. However, the TCS KA2 is much easier to source in the U.S. Since the locomotive has a MTC21 connector, the KA2 can be hardwired to pins 16 and 20 of the plug. No modification of the decoder is needed.


Contrary to my 10 year old BR86, with this locomotive Maerklin managed to keep the view through the cab open. This allows me to install figures for engineer and brakeman, as well as hide the KA2 in the rear of the cab. With a size of only 9 x 9 x 15.5mm the unit is truly tiny.


I spent most of the evening carefully disassembling the cab, plotting where to install the KA2, and painting the unit black. That's good enough for tonight.

Saturday, January 09, 2021

More Weathering Experiments


Today I decided to finish up weathering for the half dozen cars and locomotives sitting on my work bench since a few weeks ago. The weather was nice this afternoon, so I moved to the patio outside. The plan was to apply dirt and grime to undercarriage and trucks, as well as seal the Panpastel weathering effects with matte lacquer coat. I don't have much experience with the air brush yet, so this was also a good opportunity to try out a few ideas I had and see how to come out.


I used a base of Vallejo ModelAir Burnt Umber, and an overspray ComArt Soft Dirt for trucks and undercarriage. Using a thin spray of these lighter colors brings out more texture on the trucks of the American prototype car trucks, which is an effect I like. The Burnt Umber comes out a bit too redish on light surfaces as can be seen on the RBWX box car above. The Soft Dirt tones that down a bit.


I used somewhat heavier coverage of ComArt Soft Dirt on the RSD5 trucks and equipment, too.


As an experiment I sprayed an old Maerklin hopper with ComArt Soft Dirt, heavier around the wheels and frame and lighter towards the top. The top third got a light coat of ComArt Light Rust. This simple exercise took me less than 5 minutes and goes a looong way to making the car appear much less toy-like, despite the oversize ladders and crude features. Compare before and after below.


I weathered the roof and side panels of this Gbs256 box car with Panpastels, and sprayed the undercarriage and wheels with ComArt Soft Dirt. Again a very simple exercise with great effect dramatically increasing realism.


I sealed decals and Panpastel weathering on all models using thin coats from 5-10 drops of Vallejo Matt Varnish. I made sure to keep the air brush at least 6 inches away from the model to create even layers. Between cars and reloading Matt Varnish, I ran water through the air brush to minimize gunk build-up.

Finally, some trucks and frames got an application of Vallejo Dark Grey Wash.


Sunday, January 03, 2021

Module 1: Transformation

Module One was the first complete module I built. It was meant as a test whether I can work with sufficient precision to put together modules. It confirmed I can and I went on to build Untergröningen and other modules. It turned out that using a Fremo E96 endplate on both ends of the module made construction simple, but the module not particularly versatile or interesting. I planned to complete and use the module as staging backdrop for train photos, but eventually lost interest in favor of building modules that supported operations on the Welztalbahn.


Module One had a somewhat awkward size, too, so I decided to convert Module One into two small modules to transition from E96 to F96. That should be easy: Make a cut across the middle, create two modules 8 inch and 12 inch in length respectively, and fit F96 endplates reusing the rest of the module structure.


That was easy. What I didn't consider was the amount of effort it takes to fit an endplate to an existing module under existing track and align it properly with 90 degree angles. I should have just ripped off the track and cut the edge on the table saw. ... But getting out the table saw is quite some effort, too, so it probably worked out to a wash.

After fiddling with hand saws, files, and angle rulers I had a not quite square, but workable cut.  

I used a strip cut from plywood on the table saw to align endplate and roadbed and glued it in place. Here's Module 1a.

I cut and fit pieces of pink foam to fill in the gaps, glued them in place, and shaved the scenery contours with a basket rasp.

Meanwhile, I started working on the 12" module, only to find that the existing endplate was not vertical. Instead of trying to fix that, I decided to strip the module, save the endplate and connectors, and toss the rest, so there won't be a Module 1b.

The wiring on Module 1a is as simple as it gets.

I coated the pink foam with tinted Scuptamold and painted it with my regular earth color.

Next stop: grass and bushes.


Adding dirt and glue.


So far, so good.

Morning Hike: Santa Teresa County Park

Photo Credit: Tatjana

Tatjana and Jasmine joined me for a morning hike along Rocky Ridge trail today. A bit cool and partially foggy, but it warmed up as we hiked up to Coyote Peak.

Contrary to last time, there were cows out on pasture. I'm not super-comfortable when passing cows on trails, but they are more interested in chow than getting annoyed over some random hikers.


We almost caught up to the fog on the upper part of the trail. 

Friday, January 01, 2021

Happy New Year!

S.S. Palo Alto at Seacliff State Beach 

As is tradition, we spent New Year's Day on the beach. We parked at Rio Del Mar, and walked along the water. First south to Hidden Beach, then north past Seacliff Beach to Potbelly Beach, and back to Rio Del Mar. An easy 5 miles round-trip and a great day.

Thursday, December 31, 2020

New Year's Eve Visitor

Well hello there! 

One of our resident racoons decided to pay us a visit on the patio on New Years Eve throwing the evening conversation into a surprise frenzy.

Wednesday, December 30, 2020

Afternoon Hike: Santa Teresa County Park

Since Santa Clara County went into Purple Tier, our regular hiking group suspended hikes for the time being, so it was nice to hike Fortini Trail with the family today. The weather cooperated and the trail had mostly dried out after the recent rains.

Slim Staging: Storage Cover

A couple years ago I found some double-corrugated signs in the trash at work. I figured this material should be useful for ... something more appropriate than boring signs. And it was.


One of the signs now came in handy to make a cover for Slim Staging. The module itself is 10" wide. The sides add a bit more, so I cut the cover pieces 11" wide to allow for some slop.


I needed three pieces to cover the length of the module, with one piece a bit shorter than the others. After test-fitting on the module, I used hot-glue to add guides on the underside of the cover.


A small cardboard box holds the power supply, the panel for the turnouts, and other small parts for the module. I added spacers to the cover so that the box can't move around when the module is transported.
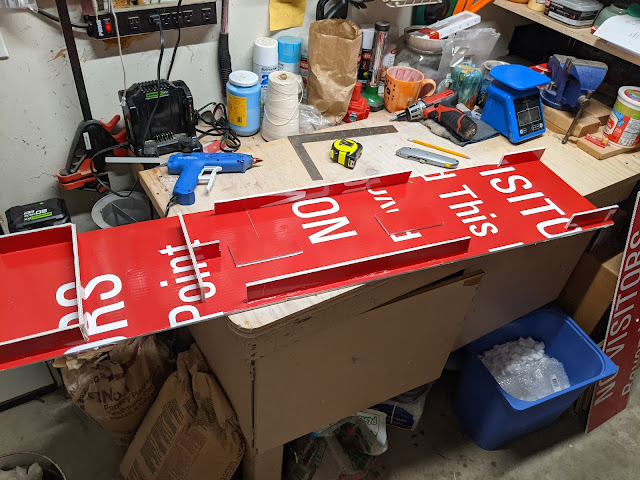

All done. Time to put Slim Staging back into storage for now.

Tuesday, December 29, 2020

Cat Tree Rebuilt

The cat tree I built 15 years needed a refresh. Yesterday and today, Tatjana and I completely rebuilt the cat tree from the ground up. It's looking nice again. 

Morning Hike at Coyote Valley Open Space Preserve


It's time for a morning hike. We need to get out of the house, preferably a place where we can minimize being around other people. California is still in the middle of a pandemic after all.


Our choice today is the Coyote Valley Open Space Preserve, a small park in the western foothills of rural Coyote Valley. 

This early in the morning we saw only a few people, but very nice views.

After hiking up the ridge towards the scenic outlook, we descend into fog for a few minutes.

The temperature dropped noticably, and I was happy to wear my warm jacket today.

However, around the next corner it was all nice and sunny again.

The trail is a one-way loop. This early in the day the park was quiet, except for the cows, a couple joggers, and a mountain biker. When we got back to the car, the small parking lot was full with cars and several families getting ready to hike the loop. Just the right time to leave and head home for a second breakfast.

Sunday, December 27, 2020

Piko 59311: Talent 2 in bwegt design (2)

BR442 Talent 2 on the Welztalbahn
The built-in Piko decoder is not particularly good. It's supposed to support MFX, but I couldn't get it recognized on the Mobile Station II. The motor control is sub-par leading to a very grumbly motor. I wanted sound with the model, and Piko offers an extension module with speaker that plugs into the SUSI port on the decoder. However, that module costs only slightly less than a new Loksound 5.0, so I ordered a Loksound 5.0 with NEM 652 plug instead. 

Programming on the roller stand
I should have ordered the Loksound 5.0 Micro instead, since the regular Loksound 5.0 just barely doesn't fit into the decoder department and is about two millimeters too high, so that the compartment can't be closed . I "fixed" that problem by fitting a piece of styrene over the opening and hold it in place with Kapton tape.

Update 2020/12/29:
I've learned in the meantime that the NEM 652 plug of the Loksound 5.0 micro doesn't fit on the socket of the model, and can't be modified like I did on the Loksound 5.0 plug. There might be a way to fix this, but it requires disassembly of the model. I might take a stab at making more room for my Loksound 5.0 at a later time if and when I have to take the model apart completely to install interior lighting.

Not pretty, but functional and invisible
As it goes with modern electrics, the operating sounds are not too exciting, but capture the atmosphere of the prototype really well.

Saturday, December 26, 2020