Showing posts with label slimstaging. Show all posts

Wednesday, December 30, 2020

Slim Staging: Storage Cover

A couple years ago I found some double-corrugated signs in the trash at work. I figured this material should be useful for ... something more appropriate than boring signs. And it was.


One of the signs now came in handy to make a cover for Slim Staging. The module itself is 10" wide. The sides add a bit more, so I cut the cover pieces 11" wide to allow for some slop.


I needed three pieces to cover the length of the module, with one piece a bit shorter than the others. After test-fitting on the module, I used hot-glue to add guides on the underside of the cover.


A small cardboard box holds the power supply, the panel for the turnouts, and other small parts for the module. I added spacers to the cover so that the box can't move around when the module is transported.
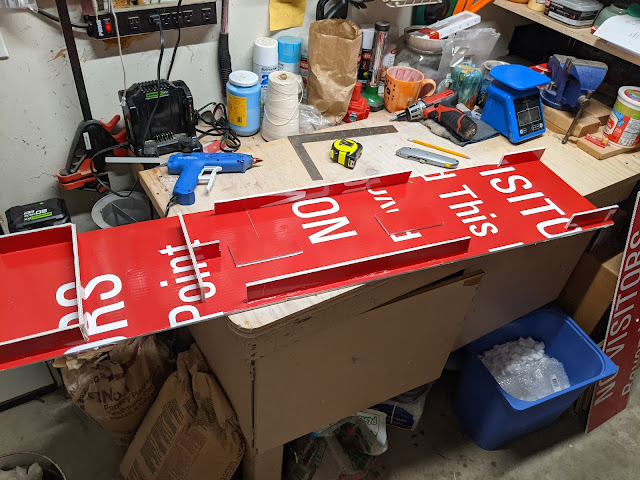

All done. Time to put Slim Staging back into storage for now.

Saturday, February 22, 2020

Untergroeningen: Backdrop and Shadow box


Primer and first coat of sky blue paint on the backdrops for Untergroeningen.

The layout lighting is not connected at the moment, so I took the photos below only with the garage lights on. However, even with that limited light, I'm very happy with how the the scene looks very different already.


Since I had the paint out already, I also painted the background panels for Slim Staging. These panels close up the sides when the yard is packed away. Now I just need something to protect the top.


Sunday, January 12, 2020

Slim Staging: Control Panel (2)


It sounded like such a good idea... Mask the push-button switches with tape, take the finished panel outside, spray it with clear coat, let it dry and I'm done. ... I did not consider that the clear coat would potentially creep under the masking tape into the switch housing and gum up the mechanics. Mineral spirits makes it work again, but only while wet. Since these are my last 6 push-button switches of this particular style, I decided to dump the two gummed up switches, salvage the other four, and replace all of them with the more common barrel-style push button switches from my supply cabinet.


Had I made the panel removable from the housing instead of gluing everything in place, this would have been a much easier task. At least I didn't burn my fingers with the soldering iron, so I call that a win.


All done. The buttons don't line up as neatly as the other style, but in reality it doesn't look nearly as messy as on the photo below.


Monday, January 06, 2020

Slim Staging: Control Panel


Many model railroaders spend an enormous amount of energy on making really, really nice looking control panels for their railroads (myself included). However, I'm lazy and I don't want to feel bad if I need to throw away a panel because the button layout needs to be changed. Hence my more recent control panels tend to be bare bones.

The panel for Slim Staging is no different. I took an off-cut of 5mm MDF, drew a schematic track plan of Slim Staging, drilled some holes, popped in the push buttons, and wired it up. I left space to wire LEDs in case they'd turn out to be useful. By the way, 5mm MDF is too thick for most through-the-hole push buttons. The buttons are held in place by friction only. We'll see how long that lasts.


Making it detachable from the module and creating a plug for the TVD QuadLN_S decoder took more effort than the panel itself.


I programmed the routes into the decoder, finished building the panel box, and cleaned up the cabling.


The only thing missing is a protective clear spray coating, but it's already functional as is.


Saturday, January 04, 2020

Kurve: Connecting Slim Staging and Untergroeningen (4)


This winter break I made major progress towards getting the Welztalbahn Extension operational. Two weeks ago I drew an outline where staging would go into a photo. Tonight I ran the inaugural train from Emsingen to Slim Staging under its own power. It's nice when an idea turns into reality.

At the beginning of the Christmas break I set myself a fairly aggressive list of tasks to get to this stage. I completed more than two-thirds of that list. To make this fully operational, a few tasks remain: One track piece on Kurve doesn't have power, and I need to drill alignment holes on the Untergroeningen side. Slim Staging needs a control panel for the staging yard. Side tracks in Untergroeningen need to be finished. Finally, I need to build a new schedule and adjust paper work.

I'm looking forward to running trains on this enlarged layout.

Slim Staging: Legs


Today I built legs for Slim Staging from 3" fir boards. The design is patterned after a design that I saw in the St. Valentin video. Bolts, washers, and wing nuts to mount the legs.


Slim Staging is slim, making height adjustments a bit tricky. The standard FREMO module at 20" is twice as wide as Slim Staging. Due to the sloping garage floor, the modules need to be an inch higher from the floor than at Untergroeningen. That exceeds the adjustment capabilities of the legs as designed, so I resorted to some additional supports.


Monday, December 30, 2019

Sim Staging: Tracks Down and Wired


I glued the servo mounts under the yard throat and aligned the servos to their respective throws. Next up was aligning the track at the Fremo-Puko modular faceplate to the Kurve module which doesn't have a laser-cut faceplate.


I turned Slim Staging around, and started laying track.


Done. The two outer tracks have just under 60 inches usable length. The two inner tracks even 65 inches, which is well beyond the ruling Welztalbahn train length of 45 inches.


I finished wiring power for the tracks in the morning.

Thursday, December 26, 2019

Slim Staging: Turnout control


I'm using Micro RC-Servos for turnout control in Slim Staging.  The hook reaches into the Maerklin throwbar from underneath the layout. This technique does not require any modifications to the turnout. The servo is screwed to a wooden base which I will glue under the module. This allows me to replace the servo if needed, hopefully without much realignment work. I'm considering using the same approach for Gaildorf/West, hence this is my experimental setup before I splurge on the electronics for the much larger station.

A little while later I had fabricated the needed turnout throws. The zig-zag is important for small adjustments of length and to protect the turnout throw if the servo ever loses its programming.


I connected the power module and test drove a servo with the Tam Valley Depot QuadLN_S decoder. The Remote Aligner is really neat, even though it's overkill for this use case.


I'm thinking about building a small control panel for the yard including route control through the turnout ladder and turnout position indicators, if I can manage. However, for now I'll start with simple toggle switches to get the yard into a functional state.

Saturday, November 02, 2019

Slim Staging: Now Portable


Well, ... yeah, I have not built the second half of Slim Staging yet. However, I'd like to store the half-finished modules out of the way for a few weeks. So I took the opportunity to make protective end plates for the yard segments with a carrying handle. This is designed to be assembled with no tools. 2" bolts and wing nuts are my default choice for module connections, so they are used here as well.

Saturday, October 26, 2019

Slim Staging: Paint


Slim Staging got a coat of paint of today, and left the two boxes out to dry and air out. I was lucky that the wind blew only the box without tracks off the saw horses ...

Tuesday, October 22, 2019

Slim Staging: Wired and Tested


I have wired and tested the tracks. The next step is to install turnout motors. I'm planning to use RC servos controlled by a Tam Valley Depot QuadLN-S stationary decoder. This decoder has support for programming routes and can drive up to 8 servos. There will be a simple control panel with push buttons that can be mounted on either side of the staging yard.


Saturday, October 19, 2019

Slim Staging: Turnout Ladder installed


I love it when a plan comes together. I went from bare box to installed track this afternoon.


Using Dynaflex 230 silicone caulk, I attached 1/4" cork tiles on top of the box. This stuff holds well, dries clear, and remains flexible. I've used this on the Welztalbahn quite successfully to reduce roadbed noise from rolling trains.


The cork tiles are 12x12 inches so I used the overhang cut-offs for the mainline track to the module edge. I aligned tracks and the Fremo faceplate and glued everything in place. I'm using Dynaflex 230 to tack down the tracks as well.


Using a mirror, I ensure that the track is hitting the module edge at a 90 degree angle. I also lined up the staging yard with Untergroeningen segment 1 to verify alignment. Looking good, and a nice demonstration why I call this yard slim staging...


Finally, I wired and installed the yard tracks. I do want detection in the yard to facilitate automated running at some later time, but I haven't decided yet which detection method I'm going to use. For now I'll just make sure that the yard tracks have dedicated feeds to allow retrofitting detection later.

Thursday, October 17, 2019

Slim Staging: Second Box


The second box of the portable staging yard is slapped together. This is not high-precision work, but it should get the job done. The photo shows the test fit with a standard FREMO F96 faceplate that will be shortened to fit the width of the box.

Tuesday, October 15, 2019

Slim Staging: A staging yard for the Welztalbahn Extension


The slim staging yard is 10 inches / 25 cm wide and 98 inches / 248 cm long. The 4 tracks are all long enough to comfortably hold a regular length train for the Welztalbahn (130 cm) with room to spare for the occasional extra-long Staging to Staging train. The left hand side will be built with a shortened Fremo-Puko F96 faceplate, so that two of the three standard holes fit the box.

There are two locomotive tracks on the left-hand side. The staging yard will be operated like a terminal station with trains running locomotive first into the storage tracks. Cars will be taken over by a waiting locomotive and form a new outbound train. Once that train has left, the original locomotive will move to the engine track to take over the next train. I'm planning an elevated road crossing the tracks at an angle as a view block separating the layout from staging.

Tonight I tested the track arrangement on the first of the two 4 foot boxes that will make up the yard. There will be protective barriers along the long sides to prevent equipment from falling to the floor. I added a mockup of the road, too.