Wednesday, December 04, 2013
Emsingen Hauptstrasse buildings
Over the last week I built a bunch of houses for the town of Emsingen. The corner is getting busy.
Different angle looking up from where the main street is eventually going to cross the tracks. Most houses in the new block are relief buildings, so only the front fassade and the roof facing the street are present, while the rear is missing. The only exception are the green house to the right of the tree, as well as the corner house on the left.
These are all built from Faller's 130430 "Relief Houses" kit. I modified the kits only slightly, and applied some gentle weathering. More weathering and patina is needed.
Saturday, November 30, 2013
Emsingen arrangements and color temperature
In the beginning the layout room was lighted by a torchiere with 300W ceiling flood light. Then I installed a single ceiling mounted fixture with 3 spot lights with daylight CFLs (7000 Kelvin). That worked ok, but was not satisfying either, since I was looking for a more consistent lighting across the whole layout. During our kitchen renovation I moved a set of fluorescent tube mounts into the layout room and installed Cool White (4000K) tubes based on the recommendations from Tony Koester's books. However, I found that the scenery felt flat in comparison to the daylight CFLs, so I picked up a 7000K tubes at Home Depot and lighted the room with that. Wow! It felt like daylight coming out of the middle of the garage, and in the first couple days I thought I left the side-door open whenever I went into the garage.
However, 7000K is a quite blue-ish light, which really brings out even tiny hints of blue in scenery colors. As I built up scenery I became increasingly unhappy with the color temperature in the room. The ballast has hues of blue-ish gray. The rocks are a little bit blue. I tried to compensate by not using brilliant white to make grey tones, as well as mix in some brown color as well. Still, it didn't quite work, and I increasingly got the feeling that the layout looks sterile.
One really neat thing is that I can take digital photos with the white balance set to sunlight and the color in the pictures captures the look just perfectly.
![]() |
| Galaxy Nexus, Sunlight white-balance, 7000K Phillips daylight fluorescent tubes |
Today I went the other extreme and replaced the 7000K tubes with 3000K warm-white tubes. Those are meant for kitchen & bath applications because they produce warm hues. And yes, the room feels much more friendly. Especially grayish colors are not as aggressive anymore.
But now I have trouble with the white balance when taking pictures...
![]() |
| Galaxy Nexus, sunlight white-balance, 3000K GE warm-white fluorescent tubes |
![]() |
| Galacy Nexus, fluorescent white-balance, 3000K GE warm-white tubes |
More experimentation is needed.
I have been building more houses for Emsingen recently, especially using relief houses to suggest depth were there isn't any. The two white houses with the red roofs to the left of the green house are have only the front-half built...
I'm starting to see an arrangement emerge for the left side of Emsingen that feels complete, and leaves room for the track to emerge from behind scenery.
Thursday, November 28, 2013
Refreshed Talheim Tower
This is the well-known Kibri kit of "Stellwerk Marbach". The kit has been produced since 1961 (!) and production stopped only recently, so it's still widely available in stores and online. My Dad had it on our layout in Germany and it was among the buildings I rescued before taking the layout apart.
The building was in somewhat sorry state (here's a picture from last year), and badly needed a refresh. Brick and wood parts were painted and I made signs. The whole building got a do-over with Bragdon powder paints. I also cut off the plastic lamp imitations, and replaced the one above the stairs with an N-scale Miniatronics 1.5V lamp with shade.
Given how old the kit is, I'm quite pleased with this refresh.
The building was in somewhat sorry state (here's a picture from last year), and badly needed a refresh. Brick and wood parts were painted and I made signs. The whole building got a do-over with Bragdon powder paints. I also cut off the plastic lamp imitations, and replaced the one above the stairs with an N-scale Miniatronics 1.5V lamp with shade.
Given how old the kit is, I'm quite pleased with this refresh.
Monday, November 18, 2013
Amenities
So, ... did this trip live up to my expectations? I wrote about scenery and people already. Let's take a look at the Amtrak side.
Food
The food on the train definitely exceeded my expectations. Everything I had tasted good and was prepared nicely. The green side-salad at lunch could have been a bit fresher, but that's really a minor issue. It stood out because it didn't live up to the level of the other food.
Breakfast was omelette with veggies and cheese, roast potatoes, croissant, coffee, and some fruit.
Lunch was Kung Pao stir fry over rice with a side salad, and a roll. Splashed down with Sierra Mist.
Dinner was a lamb chank with rice and string beans, also with a side salad and a roll. Accompanied by Sierra Nevada Pale Ale.
Sleeper
I had booked a private Roomette Sleeper compartment. The two seats convert to the lower bunk at night. A second bunk folds down from the ceiling if needed. The length of the lower bunk was perfectly adequate for my 6 ft 5 in. As mentioned in a previous post, it takes some getting used to to sleep in a moving train.
On-time performance
The train was more or less on-time pretty much for the whole distance from San Jose to Eugene, but got into Portland 35 minutes late due to track work, and then we got stuck for another 30 minutes waiting for an opposing Cascades train on a single track segment just north of Vancouver, WA. Arguably, the track work gummed things up for us. According to amtrak.com we're estimated to arrive in Seattle 15 minutes late.
Staff
Amtrak personnel on the train was super-nice throughout the trip. The sleeper car attendant, the waiters in the dining car, and in the Pacific Parlor car were very friendly and helpful. The staff kept passengers well-informed with announcements. For the trip over Cascade Summit from Klamath Falls to Eugene, a docent was riding in the observation car and talked about history, geology, railroading, and other tidbits related to the area.
Internet
There is WiFi Internet connectivity in the parlor car, but the access point was quite inconsistent, and I didn't bother much, relying instead on tethering to my mobile phone data plan. Data service was pretty good while I was awake with exception of the 3 hour section through the Cascade Range.
Seating
I spent --- somewhat to my surprise --- most of my time in a swivel cushioned chair in the parlor car. While the observation car was newer and had clearer windows, the seat setup was not as convenient and comfortable. The privacy of my Roomette has something for it, but I really enjoyed the atmosphere and all-around views from the parlor car.
Verdict
So, overall I had a lot of fun, got work done, had good food and drink, and very much enjoyed this alternate way of travel. However, I will take the plane for the return trip. 24 hours on a train twice in one week is a little bit much. Even for me.
Maybe the State of California will get its act together and indeed build a true high-speed rail connection between San Francisco and Los Angeles, depsite all the nay sayers in the Central Valley and the Peninsula. SF to LA in under 3 hours ... I'd certainly use it if such a thing existed.
Part 3 -->
Welcome to the Pacific North-West
| Willamette Valley in the rain |
Yup, the time penalty is impressive. I'm on the train for 24 hours to get from San Jose to Seattle. This is not a trip you take if you are in a hurry, or want to travel cheap. The respective 2 hour air-plane ride costs quite a bit less than the sleeper accommodation on the train, and is significantly faster. Even taking a car is faster.
Either way, this is not the point. I like this mode of travel. It's a lot more relaxing than driving, and significantly more friendly than flying with all its security madness.
I saw some stunning scenery today as we crossed the Cascades between Klamath Falls and Eugene. I got work done. And I had nice chats, good food, and drinks. What else can you ask for?
As I'm writing this dinner reservations are made. It's raining since we got into Willamette Valley. Welcome to the Pacific North-West. We're rolling into Portland and are about 39 minutes late, yet arrival time for Seattle is still estimated to be 50 minutes early.
<-- Part 2 -- Part 4 -->
Morning on the Coast Starlight
| Morning Bliss |
It took me a while to fall asleep last night. That half-cup of coffee after the beer probably didn't help. The shaking and rolling of the car as it makes its way over the fairly worn out Union Pacific tracks towards Sacramento took some time to get used to. The bed is a bit short, but more comfortable than I expected. I didn't have high expectations, so this was a pleasant surprise, though don't expect memory foam goodness here … Nevertheless, eventually the car rocks you to sleep. I slept for 7 hours with a couple interruptions twisting and turning. Overall, about as good as I hoped for.
When I woke up this morning I could see Mount Shasta in the distance behind the train. We're crossing into Oregon to a beautiful sunrise. I got dressed, took photos, and went to the dining car for breakfast. Amtrak has this interesting policy to fill up the tables in the dining car as they seat you, so you sit with three strangers and get to do conversation. As it turns out the guy across from me was stationed in Ludwigsburg for 3 years. First time ever I met an American who served in my home city, so we had a nice chat.
<-- Part 1 -- Part 3 -->
Sunday, November 17, 2013
Aboard the Coast Starlight
| Coast Starlight at Jack London Square in Oakland |
There was quite some mixed information I could find on the Internet. Some people wrote about the horrible delays. Some people wrote about their experiences with sleeping car accommodations and attendants. I really enjoy traveling by train, having done so multiple times in Germany. Nevertheless, I never took a long-distance train in the US, and was always curious about the experience.
Here we go. While writing this I'm sitting in the Willamette Parlour Car, and the train is slowly making its way through northern Santa Clara while I'm sipping on a Sierra Nevada. Finally, an opposing train clears the single track across the Bay towards Newark, and we're picking up speed.
I was quite excited when Patricia and the kids dropped me off at Diridon station. In fact, yes, I was nervous. I'm going to be on this train for the next 24 hours, and I really don't quite know what to expect. What people are going to be there? What about the staff? What about amenities? Do they have snacks?
| My bed for the night. |
There seems to be a good mix of passengers on the train. Most of the younger people headed towards the rear of the train in San Jose, while I went with the more settled folks toward the front. The train -- and especially the dining cars -- is surprisingly non-crowded, though I think this is primarily due to my travel date in the middle of November.
--> Part 2
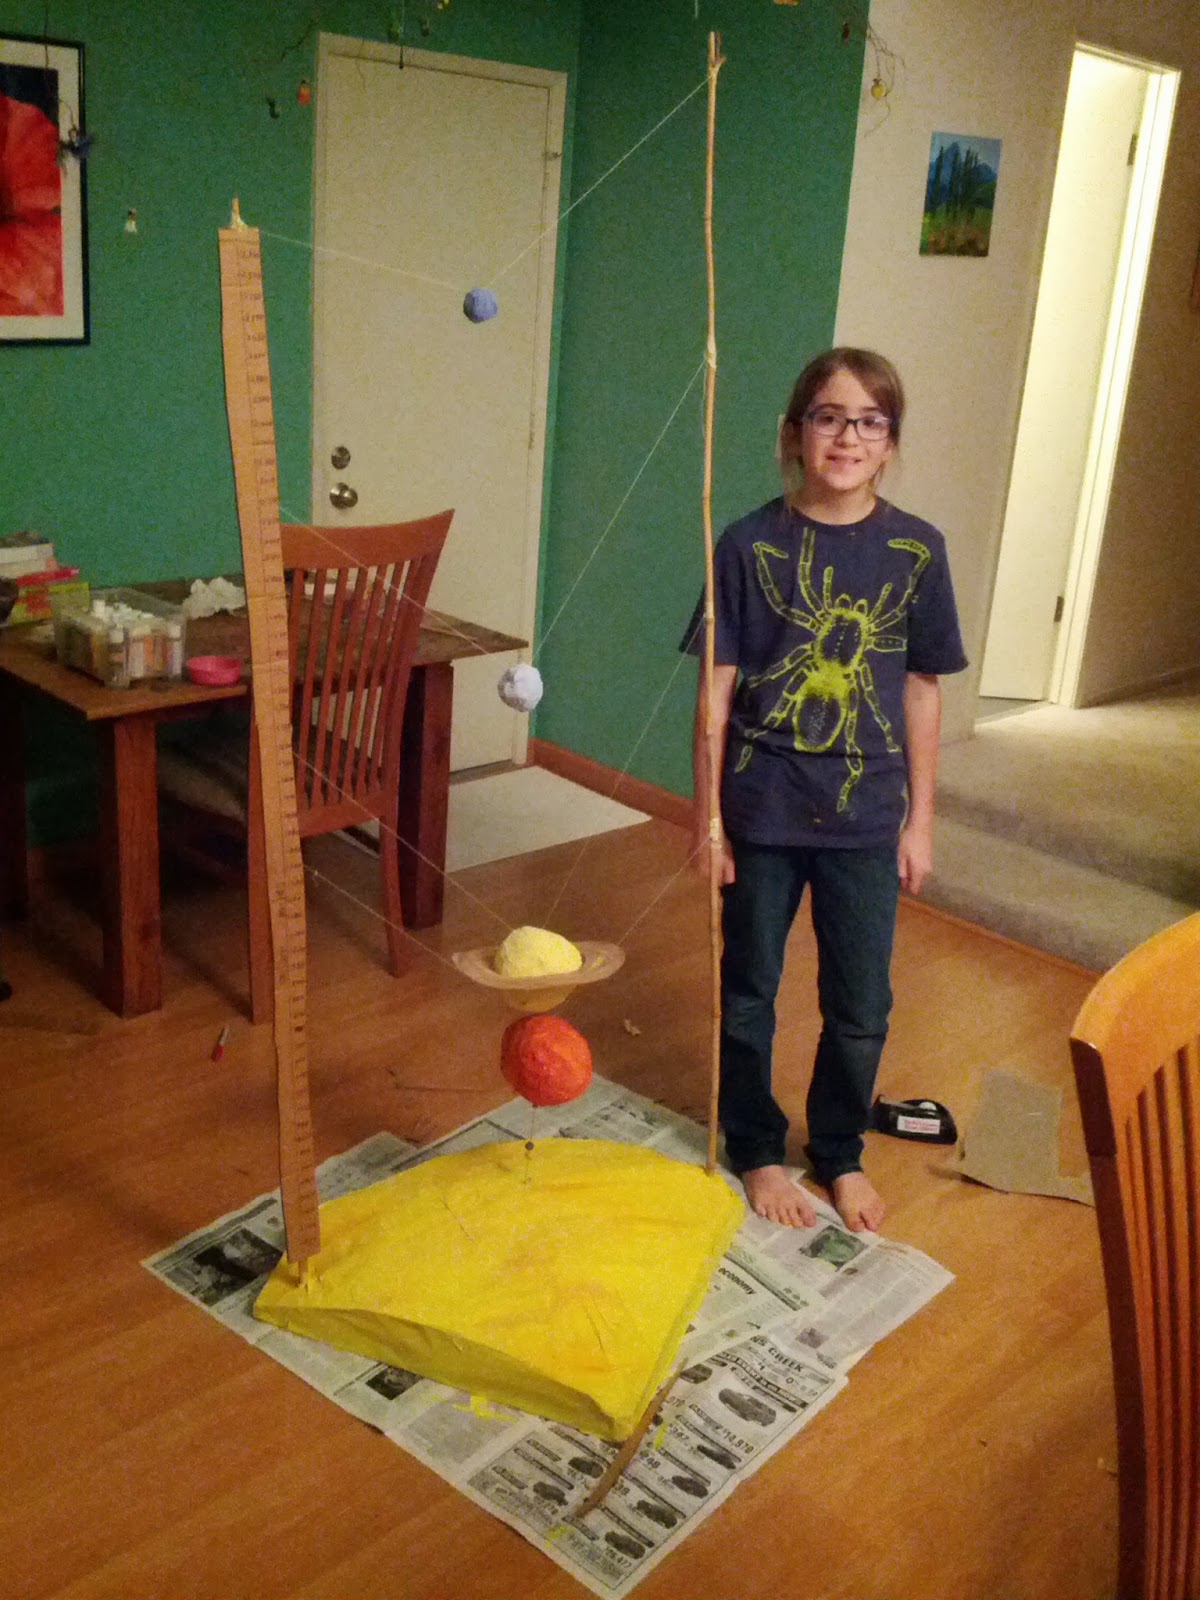
The Solar System according to Pascal
How much I love school projects. This one was particular father-son fun.
Planet diameters are scaled 1000km to 1mm. Pascal chose this scale since he already had made a "Neptune" from crumbled up masking tape.
Planet distances are scaled 50M miles to 1 inch, because we needed to fit 3000M miles into the 60 inches we had available with the bamboo sticks.
The funny scales worked out to some ... congestion ... for the inner solar system.
The sun's diameter ends up being140 cm, so we skipped building the whole thing, and instead constructed a segment of the sun using hot glued cardboard strips, covered with painted masking tape. Radius of the surface is still correct with about 70 cm.
Mercury is half an inch away from the surface of the sun. Venus and Earth are about 1.3 and 1.8 inches away, with Mars at 2.9 inches. Jupiter and Saturn are nearby, while Uranus and Neptune are appropriately far away.
"Wow, Papa, the solar system is really big." -- He understood the lesson.
By the way, Pascal made the choices what to build and how. I helped with logistics e.g. using the big drill to build "shoes" for the bamboo sticks, or showing Pascal how to construct a sun from cardboard strips, hot glue, and masking tape.
![]() |
| The Solar System according to Pascal |
Planet diameters are scaled 1000km to 1mm. Pascal chose this scale since he already had made a "Neptune" from crumbled up masking tape.
Planet distances are scaled 50M miles to 1 inch, because we needed to fit 3000M miles into the 60 inches we had available with the bamboo sticks.
The funny scales worked out to some ... congestion ... for the inner solar system.
The sun's diameter ends up being140 cm, so we skipped building the whole thing, and instead constructed a segment of the sun using hot glued cardboard strips, covered with painted masking tape. Radius of the surface is still correct with about 70 cm.
Mercury is half an inch away from the surface of the sun. Venus and Earth are about 1.3 and 1.8 inches away, with Mars at 2.9 inches. Jupiter and Saturn are nearby, while Uranus and Neptune are appropriately far away.
"Wow, Papa, the solar system is really big." -- He understood the lesson.
By the way, Pascal made the choices what to build and how. I helped with logistics e.g. using the big drill to build "shoes" for the bamboo sticks, or showing Pascal how to construct a sun from cardboard strips, hot glue, and masking tape.
Thursday, November 14, 2013
Hochwaldtunnel
The entrance to Hochwaldtunnel, just north of Talheim station. Notice the signage that says all switching moves need to stop before the tunnel.
Finally, my operators know how far they can pull out a cut of cars ...
I need to add more bushes and other greenery to this area.
Finally, my operators know how far they can pull out a cut of cars ...
I need to add more bushes and other greenery to this area.
Monday, November 11, 2013
Fixing Talheim's Track 1
What's wrong with Talheim's Track 1, you ask?
Talheim was my first foray into laying track using flex track. Not only did I learn a few lessons with that, but it was also the very first station on the layout and was set in place when pretty much nothing else existed beyond staging.
Fast forward a couple years, while I was building the return loop around Steinle it turned out that I needed an additional inch of space for the loop, so I switched the north right-hand turnout to a left-hand turnout and arranged the curve to Hochwaldtunnel slightly differently.
Since I didn't want to re-lay the flextrack in Talheim, I ended up installing a small curved bit of track that fixed up the geometry.
To get a nice curve with the new flex track, I needed to pad the roadbed on the outside of the curve a bit, as well as remove some roadbed on the inside of the curve. A nice side effect of that is that the platform for Track 2 will be a little bit wider.
Tonight I cut the flex track to length, added an extra rail joiner for the sensor pickup (you can't solder wire directly to Maerklin's track), and glued everything in place.
Much better now.
No kinks. Proper detection. Better track flow. The glue is still wet, so I can't run a train through the track and test it out yet.
Update 11/12/2013:
I ran a train over the next track tonight, ... and the southern section of Track 1 now no longer has power. Great. Apparently the flextrack section was powered from the end that I removed.
Talheim was my first foray into laying track using flex track. Not only did I learn a few lessons with that, but it was also the very first station on the layout and was set in place when pretty much nothing else existed beyond staging.
Fast forward a couple years, while I was building the return loop around Steinle it turned out that I needed an additional inch of space for the loop, so I switched the north right-hand turnout to a left-hand turnout and arranged the curve to Hochwaldtunnel slightly differently.
Since I didn't want to re-lay the flextrack in Talheim, I ended up installing a small curved bit of track that fixed up the geometry.
That's not a kink in the track next to the orange truck, that's the curved bit I inserted. ...
I also never cut the gaps in the flex track to make Track 1 detected in two blocks as I originally had planned, because there's too much pressure on the rails that would develop into kinks. Yes, Track 2 has one of those and it isn't even bent as tightly as Track 1.
For the next couple years I cringed every time a train was passing through this section. The track doesn't flow well. What's the point of flex track if you mess up the geometry like this? However, I couldn't get myself to fix it. It just bugged me, and was one of the reasons why I didn't ballast Talheim yet.
Yesterday I decided to make this right, found a piece of the flextrack in the right length, and cut out half of the existing track on Track 1. I didn't want to mess with the soldered bits across the bridge, and the track on the south side of the station is fine.
![]() |
| Track 1 northern half removed |
![]() |
| The glue for the additional roadbed dries |
Much better now.
No kinks. Proper detection. Better track flow. The glue is still wet, so I can't run a train through the track and test it out yet.
Update 11/12/2013:
I ran a train over the next track tonight, ... and the southern section of Track 1 now no longer has power. Great. Apparently the flextrack section was powered from the end that I removed.
Sunday, November 10, 2013
Loading dock
![]() |
| I cut strips of styrene for the foundation walls and glued them to the building base. |
![]() |
| The "wood planking" for the loading docks is cut, scribed, and being painted. |
![]() |
| Test fit. If you look closely you can see the stone sheets laminated on the foundation. |
Thursday, November 07, 2013
Pondering Options
![]() |
| The freight shed put in place in Emsingen |
Things to ponder:
- How far do I extend the foundation of the building to the track and the street?
For the street side I'll follow the kit and make the loading dock a cantilevered wood construction. For the track side I'll do something similar, but pull the building foundation close to the track with only a little bit overhang. Since the track is not perfectly straight I need to make the loading doc follow the track contours. - What foundation material?
Initially I thought I'd build a concrete foundation directly beneath the building, but now I'm leaning towards a cut stone look, ideally with stones sized similarly to the station building, and pull it out to the edge of the loading dock platform towards the station building and the rear. Need to stop by the Train Shop and see what they have available for that. - Extend the loading dock on either side?
I'll leave it as is on the street side, but I might add an extension made from "concrete" that extends into the curve to the right of the boxcar. - Roof material and shape?
I can't quite decide between a tarpaper-like roof, and proper roofing material like on the station building. Currently leaning towards scratch-built tarpaper imitation. - Any stairs or ladders?
Concrete stairs on the trackside next to the end of track, as well as the rear of the building. Wooden ladder or stairs on the street side. - Where to put lights?
Put LEDs or small bulbs under the eaves of the roof in two locations on both sides along the length of the building. Maybe above the doors? - Anything for the interior?
I'm planning to build a shadow box for the track side door with limited visibility into the building. I might model a small office behind the window facing the station building.
Monday, November 04, 2013
Adding dirt and moisture
The walls put together and set on the base:
I used light grey and black Bragdon weathering powders to blend colors together and add some patina to the wall sections (compare to yesterday's post).
The effect is startling. I can almost smell the moisture creeping up in those walls...
I later realized that this is better done when the model is put together to get a consistent look around the corners. However, doing this with the walls flat on the bench allowed me to experiment with the process, so it was still useful this way and I can apply what I learned the next time I use this technique.
![]() |
| View from the street |
![]() |
| View from the tracks |
The effect is startling. I can almost smell the moisture creeping up in those walls...
![]() | ||
| Added appropriate dirt and weathering |
Sunday, November 03, 2013
Emsingen freight shed walls ... scratch-built
I spent the evening on completing the wall sections for the freight shed. It took a considerable amount of time to cut the openings for the doors in the new walls without breaking the walls. I also built the actual doors, but didn't make them movable. Finally, the new walls got multiple coats of paint. An airbrush would make this a lot easier and quicker...
![]() |
| The upper walls is track-side and not touched yet. The lower wall will be facing the street, and has the door opening cut already, as well as a first coat of paint. |
![]() |
| 2.5 hours later: The street side now has the door built installed. The track side wall has the opening cut. |
I'm using fairly heavy sheet styrene as the base of the walls. It's what I had available in the right size. The boards for the siding are Evergreen #2100 V-Groove, .100" spacing, .020" thick laminated on the base. The doors are made from the same material, and laminated with Evergreen #103 .010 x .060" strip styrene. ... yes, those are 0.25mm thin.
![]() |
| Another hour later: All walls have the third coat of paint. The doors are done, and I'm getting close to done with this part. Track-side on top, street-side at bottom. |
Friday, November 01, 2013
SVL 378
Tonight I ran the one remaining train from last week's Ops session at Silicon Valley Lines.
![]() |
| Engine 3050 pulls train 378 from Nowheres to Jasper Junction, at Mt. Marvel. |
Tuesday, October 29, 2013
Adventures in scratch building
Given that I'm only re-using three walls of the freight shed from Faller's Trossingen kit, and they make up less than half of the building, I'm basically scratch building the freight shed for Emsingen.
The scratch build part will have loading doors as well, but I'll model them "closed", and glue them on top of the wall boards. ... Oh, shoot! The sliding doors hang on the inside of the building. Sigh. Won't get around creating those wall openings.
![]() |
| The shed as seen from the street. |
![]() |
| ... and the view from the tracks. |
![]() |
| The lower wall is from the Trossingen kit. I cut off the original flat gable and added a sharper one. |
![]() |
| Testing the effect with the card board roof. |
![]() |
| ... and the other side. I won't add a window in this wall. |
Sunday, October 27, 2013
Metrolink Highrailer in Burbank, CA
For Maintenance Of Way activities pretty much all US railroads use SUVs fitted with small wheels that fit on the track and guide the car.
Layout Computer Shenanigans
Snowy is the Ubuntu machine controlling my layout with JMRI. I used an old Antex Sonata multimedia case for this machine.
Last Saturday, there was an "electric smell" in the garage. It took us a little while to locate it, but, you guessed it, the power supply in Snowy was dead, and I immediately suspected a popped capacitor in the power supply. Time for a new one. I got the old one out, drove down to Central Computers and ... learned that this power supply is specially made for the Sonata case, and no longer available. Well, at least they didn't have any that would fit. So I ended up spending a little bit more and got a new CoolerMaster case with power supply included.
While at it, I decided to do what I always wanted to do and mount a computer screen in a corner above the layout. Big daughter is abroad for a year, and she's mostly using her laptop anyways, so that nice 17" monitor got mounted to a wall bracket and installed above the Emsingen roundhouse.
Today I put it all together again. Here are a few shots of what the setup looks like now.
With the old case it always bugged me that I had to open a server cabinet door to turn on the computer. For the new setup, I took the power button socket from the old case, extended it and added a push button at the far end. The button is now mounted to the shelf on the side of the cabinet and conveniently accessible.
Last Saturday, there was an "electric smell" in the garage. It took us a little while to locate it, but, you guessed it, the power supply in Snowy was dead, and I immediately suspected a popped capacitor in the power supply. Time for a new one. I got the old one out, drove down to Central Computers and ... learned that this power supply is specially made for the Sonata case, and no longer available. Well, at least they didn't have any that would fit. So I ended up spending a little bit more and got a new CoolerMaster case with power supply included.
While at it, I decided to do what I always wanted to do and mount a computer screen in a corner above the layout. Big daughter is abroad for a year, and she's mostly using her laptop anyways, so that nice 17" monitor got mounted to a wall bracket and installed above the Emsingen roundhouse.
Today I put it all together again. Here are a few shots of what the setup looks like now.
![]() |
| The screen is mounted to the beam above the Emsingen roundhouse. The cables for power and video signal go down the server in the triangular channel in the corner. |
![]() |
| The screen is big enough to show the JMRI layout editor view of the whole layout, plus imagery from hidden staging. The red lines show occupied tracks in Emsingen. |
![]() |
| On the left is Chef, our home server. On the right is the new Snowy case, and the UPS on the far right. |
![]() |
| Snowy's power button is the small black push button mounted to hard board in the center of this picture. |
Monday, October 21, 2013
Monday, October 07, 2013
A Bridge
In preparation for a school project, Pascal decided this afternoon to build a through-truss bridge ...
All by himself...
From tooth picks and hot glue!
All by himself...
From tooth picks and hot glue!
Even the beams running the length of the bridge are made from tooth picks. Pascal first built the end supports, then the lower beams and the truss on each side. Afterwards he connected the trusses at the top, and built the deck.
Sunday, October 06, 2013
Attack of the Boy
This is what's left of our old kitchen mixer after Pascal wanted to know what it looks like from the inside...
Saturday, October 05, 2013
Emsingen Freight shed mock-up
The freight shed sits at to the "Gueterschuppen" track next to Emsingen station.
![]() |
| Emsingen main station and freight shed mock-up. |
![]() |
| Aerial view of station area. |
I want the shed to not look silly when putting two freight cars next to it, so it needs to be a decent size. Since I'm kit-bashing it, I'm assuming that it was originally built smaller, and expanded later to double its size. The parts I have call for a single-story building with a fairly low angled roof.
![]() |
| The footprint of shed feels a bit large but works well with the freight cars at the loading dock |
![]() |
| The loading dock wraps around one side of the freight shed. Dock height will be set to meet car floor at level height. |
Figuring out what the freight shed is going to look like
Now that the Emsingen station building is basically complete, I need to figure out what the freight shed is going to look like. This will be kit-bashed from parts of the attached freight shed included with the kit, and styrene sheets. Do I want two doors to the loading platform or one? Which wall segments will be built from kit parts, which from styrene parts? Do I want to build the shed to the size of roof parts I have? If bigger, should I cobble together the roof from cut parts, or build a roof from scratch?
...
So many questions to answer.
Before cutting styrene I should make a cardboard mockup.
Subscribe to:
Posts (Atom)