Friday, July 03, 2020

SVL: Raspberry Pi Zero Camera Car with Streaming Video


We're still tuning the software and streaming setup, but the hardware looks feasible.

This is a Raspberry Pi Zero W with the Zero Spy Cam and a Juicebox Zero battery board connected to a 2000mAh Li-Ion battery. A completely self-contained camera setup that easily fits on a HO flat car and can stream video over existing Wifi. If I stack the components more intelligently, it fits on a much shorter car, too.


During the Show&Tell at tonight's club meeting, we demonstrated the setup at the workbench and on the Welztalbahn.


Members on the video conference were able to observe the trip with only a few seconds delay. This worked much better than expected.

So far, so good. The real test will be trying this out at the club.

Wednesday, July 01, 2020

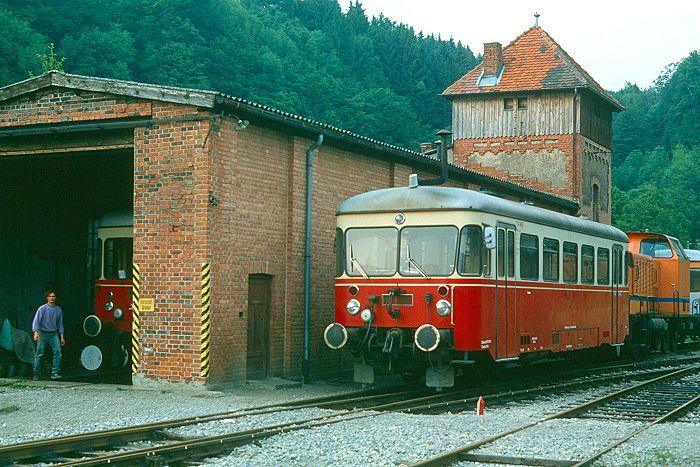
Untergroeningen: Locomotive Shed (7)

[ part 6 ]

With the mainline track in place, I can finally figure out exact placement of the locomotive shed on the module. This also sets the parameters for how much of the loco shop I will be able to build. (Spoiler: Not a lot.)

I tested clearance with the longest car I have, the middle car of a BR 614 DMU. My rendition of the locomotive shed came out a little bit too tall overall. I might have been better off scratchbuilding the building altogether. Oh well, it should still be a fine building once completed.


Because of the non-prototypical curve to the Welztalbahn connector, I had to angle the locomotive shed away from tracks a little bit, which in turn requires a slight S-curve in the track leading to the shed, which -- to my utter surprise -- is also present in the prototype track arrangement. Cool!

[ part 8 ]

Tuesday, June 30, 2020

Untergroeningen: Trackwork (3)


[ part 2 ]

When I planned segment three, I flipped the direction of the crossover compared to the prototype because I figured it would be helpful to have a passing siding on the way to Slim Staging. Let's just say that wasn't such a great idea. It makes switching the ramp cumbersome. Remember, the prototype is (almost) always right. Change the track arrangement only if you really thought it through. Over the last couple weeks, I slowly reworked the crossover, reusing one of the turnouts.


  Here's the segment on the workbench. I'm remounting the Tortoise turnout motors.


Aligning the track on the segment so that I get maximum length and width of the ramp, while not diverging too much from the existing arrangement took a little bit experimentation. Now I just need to fit the curve to the Welztalbahn connector.


For curves I prefer to install the puko-strips the old fashioned way using brass screws in the roadbed on the centerline and soldering the puko-strip to them.


The surrounding tracks rest on a thin strip of cork. I glue the strips to the roadbed to get the same track elevation.


After some fiddling with the track piece, a few swear words, and some patient convincing the curve is properly aligned on the puko-strip, and spiked down.

[ part 4 ]

Wildlife on the Commute: Phidippus audax


Admittedly, my commute these days consists primarily of the walk from the bedroom to the patio.

Friday, June 26, 2020

SVL: Socially Distanced Remote Ops (2)


[ part 1 ]

Tonight was the ops session we have been planning for the last few weeks. Since we are in the middle of a global pandemic, we decided to severely limit on-site attendance, institute social distancing, wearing masks, and try out remote participation.

Instead of the usual 10 - 15 session participants in the layout room, we had only four: A yardmaster for Nowheres, and three engineers. Plus myself for the Internet and streaming stuff. We also had three club members joining us remotely as engineers, as well as a remote dispatcher.

Remote control of our web-based layout panels and locomotives on the layout is easily accomplished using a VPN application that connects remote devices to the club network. EngineDriver's automatic discovery of JMRI's Withrottle Server doesn't work over the VPN connection. Instead, remote participants need to enter IP and port number of the computer running JMRI manually. In our case 192.168.8.10, port 12090. The control and dispatcher web panels are available at http://192.168.8.10:3000 over the VPN connection as well.


Over the course of the afternoon I installed cameras in the layout room. I got two Foscam X1 cameras relatively cheap during a Father's Day sale, and used the IP Webcam app on two Android smartphones as additional IP cameras. All four cameras were streaming video into OBS.

I set up the Foscam X1 with the Foscam phone app: Scan the bar code of the camera, enter wifi information, point camera at phone, add camera to phone app for configuration. I was unable to get the browser interface of the camera to work with Chrome, Firefox, or Safari, but didn't try very hard. In Chrome and Firefox I got and empty page, while with Safari I got at least to the login page, but attempts to login resulted in a failed refresh. I didn't debug this in any depth, and haven't tried with a browser on Windows yet.

The OBS setup is quite simple. For each camera:

  • Add Media Source and give it a unique name
  • Uncheck "Local File"
  • Check "Restart playback when source becomes available"
  • Set Network Buffering to 1MB
  • Input:
    • For the Foscam X1 use rtsp://login:password@192.168.8.XXX:88/subVideo
    • For the IP Webcam use http://192.168.8.XXX:8080/video
  • Leave Input Format empty
  • Click [Ok]
The video feed shows up in the projector window.  Arrange to liking. I'm using the subVideo feed on the Foscam, since I set the OBS projector to 720p and planned to have 4 cameras on the screen. There is no need to stream HD from the camera if the stream gets downscaled to 360p anyways.

I set up the four cameras to cover as much of the layout room as I could pull off, with the intent to give remote operators as much visibility of the main line as possible, so that they get to see the trains they are running.

OBS can stream to Youtube, which I did for a good part of the session, but the more important feature is to make the projector output visible to the remote participants on Google Meet. I planned to use the OBS VirtualCam plugin, but forgot to restart the browser after installing it, so the OBS Virtual Cam option did not show up as possible inputs for video conferencing, which made me sad. I read that Zoom and Skype had disabled virtual cameras in their applications, so I thought maybe Google had done the same (It didn't. It was just my own stupidity).
I used the Google Meet presentation feature to send the camera window to the video conference instead. Worked fine for me, but not for anybody else. There was a random delay on the window capture presentation stream, between 10 - 120 seconds behind real time. This made it impossible for remote engineers to safely run trains, and put quite a damper on the session. Sorry, guys!

The control stand
I spent the evening in front of computers. On the left is the FRS Radio / Meet gateway. This old Dell laptop runs Linux and has separate microphone and head set plugs, with microphones taped to computer and headset speakers. The 17" MacBook Pro in the middle runs OBS and acts as the hub for all the video streams, including broadcasting to Meet and Youtube Live. The 15" MacBook Pro on the right was my control for the Youtube Live stream.

When we do this the next time, I will set up in the dispatchers office, which has a much more comfortable desk area and comfortable chairs.

This was another step to restarting operations at Silicon Valley Lines. Operations sessions as we know them will not be possible for a while. Some remote participation component will be needed for the time begin.

We confirmed that a remote dispatcher with engineers in the layout room is feasible. However, more work is required to reliably set audio levels to avoid clipping, and improve audio quality. At times, engineers in the layout room had trouble hearing dispatcher instructions. Participants on the video conference heard background noise or buzzing that was picked up by the microphone of the FRS gateway computer. These issues should be addressed by replacing the truly analog audio gateway with a circuit that directly connects headset out / microphone in with microphone in / headset out on the radio, taking into account properly adjusting audio levels in both directions.

We need to confirm end-to-end delay of visual feedback through OBS to remote video conference participants is better when using the VirtualCam plug-in.

The club Internet connection has 24 MBit/s downlink and 5 MBit/s uplink. We found that throughput on the uplink was very variable. I stopped the Youtube Live stream halfway through the session after downgrading quality multiple times to free up more bandwidth for Google Meet. That definitely resulted in improved video and audio quality with less artifacts.

IP Webcam did not work reliably on some phones, while it worked just fine on another phone. On problematic phones the app stopped streaming to OBS on a regular basis. Sometimes the app crashed on the phone. I couldn't find a specific root cause for these problems, but noticed that one of the phones I tried got very warm during streaming.

Finally, we need to build a more compelling remote engineer experience. While the camera setup I put together allows for an ok overview of the layout room, it very much has a security camera feel to it. We will try to make it more reliable, but even then it's at best nice as a novelty.

What we really want to do is to put the remote engineer in the middle of the action. If you can't be there, maybe with technology we can provide an experience that is not possible when standing in the layout room.

Stay tuned.

Tuesday, June 23, 2020

Experiments: FRS Radio Video Conference Gateway


In normal times, Silicon Valley Lines runs one operating session per month. In these times ... not so much. Density of people in the layout room is the main problem with social distancing. Cutting down on the number of people, wearing masks, proper hand santitation, and keeping social distance is a requirement in these times.

What would it take to have a remote dispatcher patched into the FRS radios used by the engineers in the layout room? Video Conferencing solutions like Google Meet, Zoom, Skype, and others bridge the long-distance connection easily. However, how do I connect a FRS radio to a computer?

Should be easy: Connect the headphone speaker of a radio to the microphone in on the laptop, and the line out of the laptop to the microphone of the radio. Not so fast! The voltage levels between line, speaker, and microphone vary quite a bit. It's not just about plugging stuff together with the correct wires, but rather needs some circuitry to translate the signals properly in both directions.

The next idea I had was to connect a headset to the radio, so that I have physically separated places for speaker and microphone, and tape the microphone of a computer headset to the earpiece from the radio, and the computer ear piece to the radio headset microphone. With a headset plugged in the radio automatically goes into VOX mode when turned on. When the radio "hears" something being said, it starts transmitting. There is a delay of 2-3 seconds before radio transmission starts, so people on the "computer" side need to add a couple filler words to all their transmissions. This worked, but volume level from radio back to the computer side was very low and very garbled.

Eventually I found a setup that works reasonably well. I'm using a new cheap ear piece and microphone for the radio side, and regular earbuds for the computer side. The 4-pole 3.5mm jack of the earbuds goes into a splitter cable that converts the wiring to two 3.5mm stereo plugs. The microphone is plugged into a small external denoise adapter and into the computer. I taped the ear piece of the radio side to the microphone of the computer side, and taped the microphone of the radio side to the laptop speaker. The photo above shows the early test setup using a TED talk on Youtube. The volume on the computer needs to be loud enough that the radio starts transmitting, but not so loud that it overwhelms the radio microphone, but with some experimenting the right level was found quickly. A remote dispatcher (or remote engineer) should probably have a microphone close to his month and not use the built-in microphone of their computer.

Participants on the video conference will be able to see the video feed from the layout room and hear the conversation of dispatcher and crews.

I'm still interested in the proper circuitry for connecting the radio directly to the computer, but that's for another time. In addition, at least my Motorola Talkabout radios don't work if they are plugged into a charger, which makes me really sad.

Sunday, June 21, 2020

Untergroeningen: Platform (3)

[ part 2 ]

Taking a break from rebuilding the tracks on Segment Three I decided tonight to paint the platform on Segment Two. I'm using Woodland Scenics Asphalt Top Coat, which is easy to use and has a very pleasing asphalt color. I find it fascinating how a little bit color can change the scene.


A source of frustration in this area was Track One. At the station building the track is embedded in asphalt. Building track embedded in pavement is always a challenge on Maerklin layouts because the center studs get in the way. I've tried various approaches for this in the past (e.g. the railroad crossing in Emsingen). Here I filled the gaps between the ties with very fine sand, leveled it to the top of the ties, and glued it down like ballast. The Puko-Strip from WeichenWalter sticks up slightly above the ties. I was concerned that the difference in texture would be jarring, and that I couldn't get the top of the center studs properly cleaned after painting. However, cleanup was easy and here's Koef III creeping slowly over the track embedded in asphalt. The texture difference is not as bad as I feared and the center studs are barely visible.


Saturday, June 20, 2020

Experimenting


I'm playing with old smart phones as IP webcams, Open Broadcaster Software to stream video to Youtube Live, FRS radio to computer audio, ... This might be going somewhere useful.

Thursday, June 18, 2020

A ride up the hill


I finally got over my internal "Schweinehund" today, hopped on the bike, and climbed the hill at Santa Teresa County Park to the gates of IBM. Even at 7:30am it was impressively warm already. After months of being sequestered at home, the climb was a bit harder than I expected, but the downhill ride makes up for the pain.

There's a nice view of Almaden Quicksilver Park and Mt. Umunhum from the small parking lot at the top of the hill.

Tuesday, June 02, 2020

Untergroeningen: Workbench Chaos


Slowly making progress on segment three. Getting there. Piece by piece.

Monday, June 01, 2020

Kurve: Extension Storage case


Here's a little finger exercise to get my mind off other things going on in this country. A small box connects the rest of the Kurve module to Slim Staging yard. While I built a storage case for Kurve a while ago, today the extension finally got its respective case. I'm using hardboard with glued and stapled strips of wood. I made the case high enough to leave room for some bushes and small trees on the hill as a transition to the trees on Kurve.


The main motivation for building the case is to protect the scenery from damage and dust while the module is stored in the garage. 

Friday, May 29, 2020

SVL: Socially Distanced Remote Ops


Due to social distancing guidelines still in effect, Silicon Valley Lines canceled the May ops session originally scheduled for tonight. We discussed doing another remote ops session instead, and decided that this time we'd try to do a session from the club. This was to test both our ability to implement social distancing, as well as whether and how to incorporate remote operators into an operations scheme. Another goal tonight was to stress-test the club's Internet connection with multiple video streams in a multi-user setting.


We set up various cameras to record the action from different angles. We also moved the cameras around to capture trains as they moved from yards over the layout to their destinations for switching.


The verdict:
Over the course of the evening we ran a whopping four trains, instead of the 25 trains we normally run.
We can easily support a remote dispatcher and give remote operators control of a train. We have the technology to do that.

However, our Internet uplink does not support multiple HD streams in parallel. The double-deck arrangement makes visual train control via cameras challenging for a remote operator. While detected sections on the layout work well, and are needed for signaling, not all blocks have detection for various reasons. While normal video encoders for conferencing software prefer to show movement at the cost of lower resolution, for our purposes we probably prefer high resolution at the cost of reduced frame rate.


Even when the county's shelter-in-place orders are lifted, I expect that we will need to continue some form of social distancing measures for the time being, including wearing masks. A well-attended ops session is a lot of fun with a lot of energy in the room. However, the health of club members and visitors is paramount. More discussions are needed to find a way to run an ops session at the club that is fun, but avoids crowding in the aisles, and minimizes health risks. Very likely this will include a remote engineer component, and we need to figure out how to make that fun and satisfying for everyone involved.
[ part 2 ]

Monday, May 25, 2020

Untergroeningen: Locomotive Shed (6)

[ part 5 ]

After I went through the rather involved experience of cutting Auhagen BKS panels for the water tower in part 3 with an xacto knife, I remembered having read about how "nibblers" make cutting window openings much easier. I'm still planning to scratchbuild / kitbash the Untergroeningen station building and certainly was not in the mood to make the dozen plus windows I will need the same way I made the cutouts on the wall sections. It looks like there are only a couple models of nibblers out there, normally intended for cutting thin sheet metal. Should work fine for plastic. So I ordered the more common model.


I tested the tool with a scrap wall panel and installed an Auhagen door in the scrap piece. With a little bit of practice I was able to make straight cuts. Alright, moving on to the panel where it matters. Based on a prototype photo I chose the smaller Auhagen door for size and marked the location on the panel.


In less than a minute I cut the door opening. So easy. Yes, I can do the windows this way. Phew.


The brick arch over the door is a little bit more involved. I carefully scribed the edge of the arch on the brick panel, and then scribed it a bit more, so the edge is easier to see.


I used the nibbler to cut as close to the scribed line as I can get and then carefully enlarged the opening with a variety of files and emory board until the arch fit in the opening. On the scratch piece I did a better job matching the curvature of the opening to the arch. Here I ended up with an unsightly gap above the arch, which I carefully filled with wood glue. Elmer's White Glue should work as well, but I prefer the slightly more gooey consistency of Titebond II applied with the tip of a tooth pick.


Right. I'm done here.


... or am I? Another look at the prototype photo confirms that the door doesn't really fit. Let's build something that's more similar to the door of the prototype. The Auhagen door has a good size, so I just need a different boarding pattern. For starters I cut a the door shape from styrene. 


... and then decided that starting with a V-Groove pattern sheet (such as Evergreen 2025) would be easier, so I threw the styrene piece away and started over. I used 0.10" x 0.40" and 0.10" x 0.60" Evergreen styrene strips to make the door pattern.


And the result is a much better match for the prototype. I taped the door in position for safekeeping until it is time to paint the shed.

[ part 7 ]

Saturday, May 23, 2020

SVL: Introduction to operations using DTC

John Abatecola from TSG Multimedia produced a great video introduction to how operations with DTC works. Not only is this video really well done, but also shows how much fun we are having at the cllub during operating sessions.


Friday, May 22, 2020

Untergroeningen: Locomotive Shed (5)

[ part 4 ]

I gave an update on the locomotive shed to the Silicon Valley Lines member ship during the virtual club meeting tonight, and continued working on the water tower roof. The ridge tiles are now in place, slightly crooked but definitely workable.
[ part 6 ]

Sunday, May 17, 2020

Untergroeningen: Locomotive Shed (4)

[ part 3 ]

It was time for more work on the water tower. I built a substructure to glue the wood board sheets to. This is made from real wood. I hope to be able to replicate the greying effect of weathered wood more easily this way. However, that also means the piece needs to be removable, since it will get in the way when painting the rest of the water tower.

Getting the parts right and waiting for the glue to dry takes some time, so I watched today's OpSIG Second Section presentations on Zoom, while I was working. With COVID-19 still keeping many people at home, more and more online events are showing up lately. ETE Bay Area has weekly get togethers, ETE National has a weekly presentation schedule. Silicon Valley Lines has weekly online meetings. The NMRA ran their second NMRAx event yesterday. The OpSIG has weekly presentations. It's getting busy.


With the boarding in place, I moved on to build the water tower roof. I first made a roof from thin card stock to confirm look and feel. Since the OpSIG event was over by now, I switched over to Youtube and played a cab view video of an Austrian train going from Bruck a. d. Mur to Villach. 


Making roof pieces of the right size and shape for me is always a little bit hit or miss. And when I don't remember that these roof tile sheets are fairly brittle and break easily, I have even more mistakes to fix.


Nevertheless, I produced a fairly shoddy looking roof, which happens to work in my favor in this case. The 4 panels are not exactly the same size and I filed the edges before test fitting (not to self: do it the other way 'round). The roof will need more work, if it can be salvaged at all, but this is good enough for today. I should have made the roof sections a few millimeters higher to match the prototype more closely. Oh well, if I can get the edges straightened out, I'm not going to redo it just for that.

[ part 5 ]

Saturday, May 16, 2020

Untergroeningen: Locomotive Shed (3)


[ part 2 ]

I continued working on the locomotive shed for Untergroeningen. The next element I need to build is the water tower. I copied various Auhagen wall elements and worked out how to cut them so that the water tower doesn't appear too high, or too slim in relation to photos I had printed out.

The defining features of the water tower are the decorative brickwork at the upper story, the wood boarding, and the distinctive roof. While I'm likely not going to be able to match the details, I'm trying to get close. I started with the brickwork by cutting an opening in one of the wall segments. After I was done, it was clear that the shape is not right (see on the left), and I need to go wider (see on the right)


The brickwork includes a single window. I contemplated for a while to just use a standard piece from the Auhagen system and make my life dramatically easier. However, I'm already going through all this trouble, so might as well try and stay as close to the prototype as I can manage. I cut the brick for the windows from another element.


There. That works.


Next I adjusted the styrene filler to fit around the window and completed one wall section.


Combined with the corner pieces, the water tower gets pretty close in appearance to the original. The wooden boards below the roof line are next. 


[ part 4 ]